Introduction
Who doesn’t have a voyeuristic tendency when it comes to other people’s brew gear? I thought I’d share a peek into my brew box.
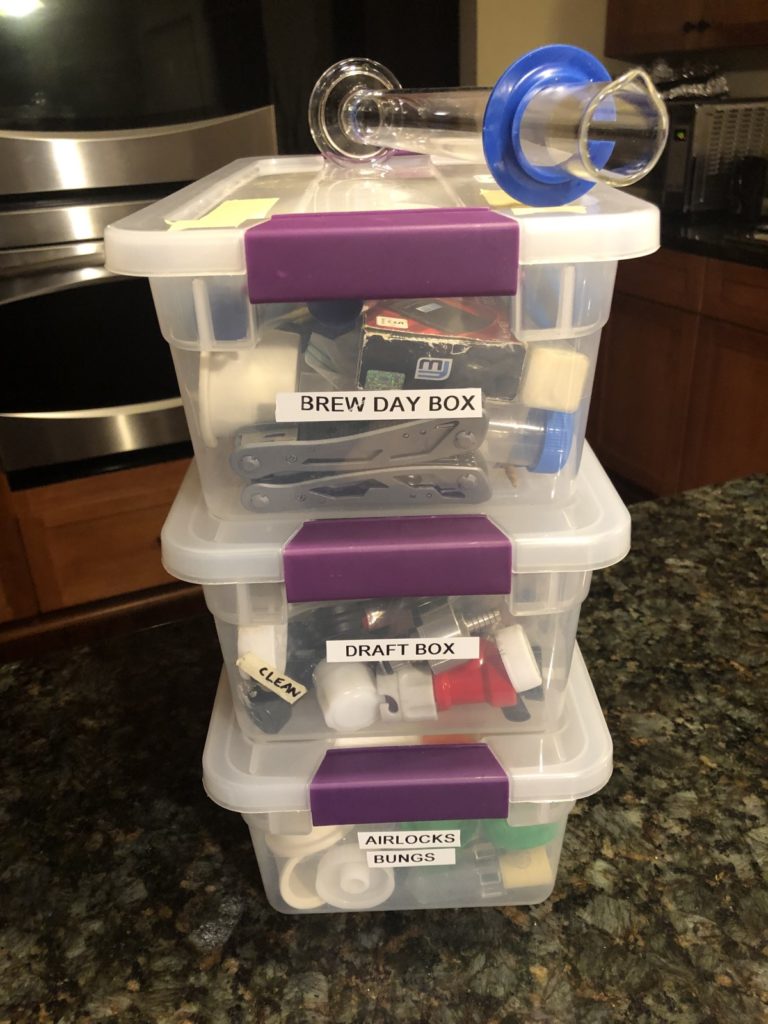
The box itself is a basic, 6-quart (5.7L) Sterilite latching tote I got from Target. I have a few of these boxes, which stack conveniently, including an “airlocks and bungs” box, a draft box (QDs, o-rings, faucet wrench, etc.), and a bottling box (mostly bottle caps plus a finishing hydrometer).
Here are the innards of my brew day box, all knolled out:
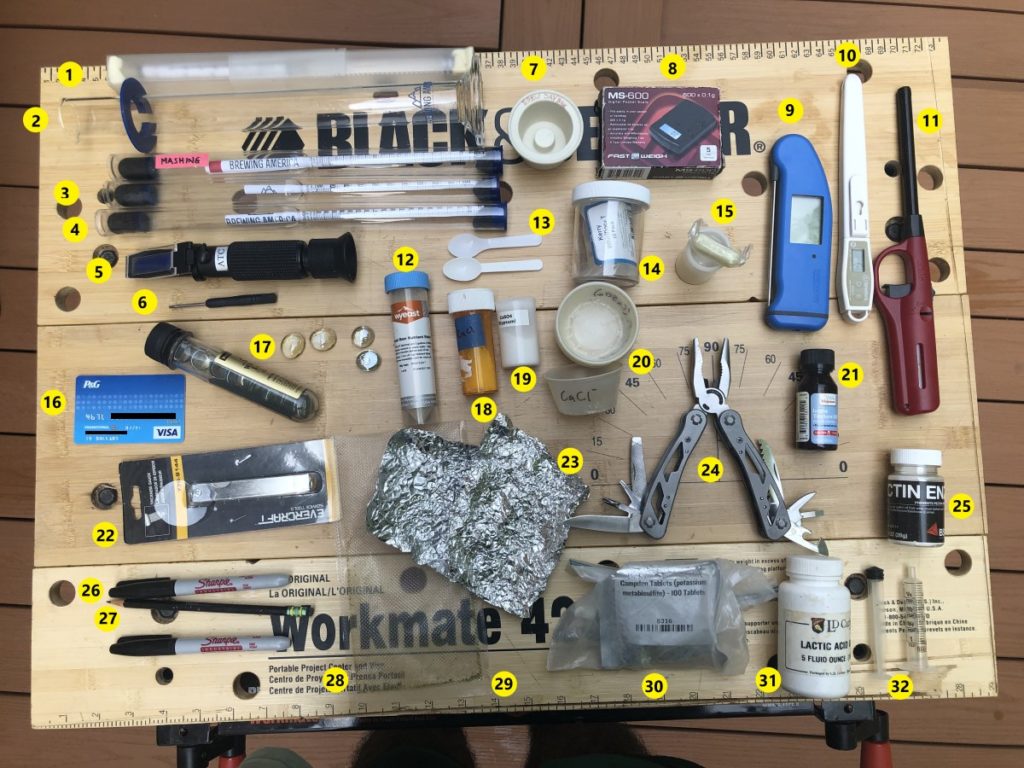
Yes, I know the picture is crooked and it’s hurting my OCD too. I’m just not skilled enough in gimp (or even Microsoft Paint) to fix it!
Disclosure: some of the links below are referral links (affiliate links). This means that this site gets a small portion if you click on a link and buy the product — without costing you any more. If you do not want to send this site a few cents, just delete everything after the question mark in the URL/link.
All revenue generated by the site has been plowed bck into making the podcast and blog better. It surprisingly costs a lot to run even an amateur operation like this. For example. besides costs for hosting and WordPress plugins, we use many software applications. many of which are licensed on a recurring basis. For example, we utilize software for podcast recording, producing audio, and editing text and graphics. Content creators deserve to get paid for their work, so we license (and pay for) all of the copyrighted content we use. We are upgrading our audio production equipment to provide a better experience to listeners. And when we run recipes, we have researched developed them to ensure the best results for you.
1 – Hydrometer
I’ve been charged with being a hydrometer nerd. Here’s the evidence against me: Exhibit A (“Going Deep on Hydrometers, Part 1 of 2”) and Exhibit B (“Going Deep on Hydrometers, Part 2 of 2”). Guilty as charged, I guess.
I bought this vintage, lead-ballasted, French hydrometer at a homebrew garage sale for $1, and love its heft and the fact that it’s still dead on the nuts in terms of calibration after 50+ years. Sorry, I forgot to take it out of its case to show it off for this picture!
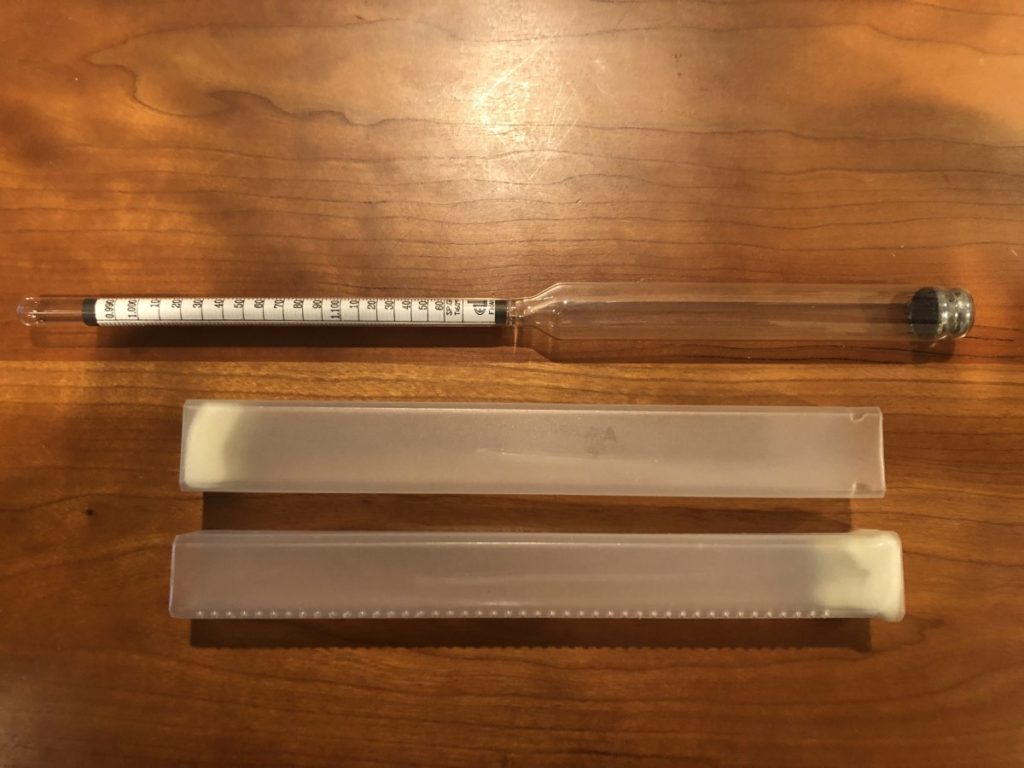
2 – Brewing America Borosilicate Sample Tube for Hydrometer
OK, so this technically doesn’t fit inside my brew box, so I store it in its padded box on top of the brew box. This borosilicate sample tube is awesome because it requires about half as much wort as my old, standard plastic hydrometer tube. Being borosilicate, I can fill it with boiling wort, sterilize it in the oven, clean it with a brush with confidence that it won’t scratch, and even drop it.
3 – More Hydrometers! (Brewing America brand)
Look, I already told you I love hydrometers. The hydrometer on the top is the Brewing America mashing temperature hydrometer (calibrated to 155°F/68°C). The mashing hydrometer is magic for taking mash and post-mash gravity samples, and I was glad to have it when I was making a big stout a couple weekends ago in an overstuffed mash tun, and needed a measurement to give me confidence I was going to hit my target starting gravity. The next one down is a Brewing America wide scale hydrometer that has only a single scale (specific gravity) and is my main hydrometer because it is so easy to read.
4 – Another Hydrometer (Brewing America brand)
This last hydrometer is a standard Brewing America triple scale hydrometer. I keep this one because its scale goes high enough to read gravities on huge beers.
By the way, I’ve got yet another hydrometer I use frequently in my “packaging box” (bottle caps, corney quick disconnects, o-rings, etc.). It’s a precision, narrow-scale hydrometer (0.980 to 1.020) that I use for very accurate measurements of finishing gravities.
5 – Refractometer
I like refractometers too. Before I got the mashing hydrometer, I used my basic refractometer for on-the-fly measurements of pre-boil wort gravity to check if I needed to adjust my recipe or brew plan.
6 – Refractometer Calibration Tool
This is just a little screwdriver, but it’s a critical tool because I recalibrate my hydrometer before my first use on any day. I could use the multitool in a pinch (see # 24).
7 – Solid, Medium Universal Carboy Bung
I use this bung to shake and oxygenate wort for beers on which I don’t plan to get out my oxygenation setup. When I am cold crashing in PET carboys, I also use this. I have another one in my cleaning supplies box for swishing around water and cleaner when it’s time to clean that carboy.
8 – Precision Scale
I made a mistake and bought a “gram scale” that had 0.1-gram resolution instead of 0.01-gram resolution. Like a typical homebrewer, I’m too frugal to correct this error. I use it to measure hops for my usual small batches, minerals for water additions, Whirlfloc-T, and yeast nutrient. If I bought a new one, this is the one I would get.
9 – Thermoworks Thermapen Mk4
You don’t need a really fancy thermometer like the Thermapen Mk4 to make good beer. In fact, for years I used a CDN DT450X that I got from Amazon for around $10. That thing survived being ”fermented” in two different beers (around 4 weeks immersion time) and melted on the grill, and is still going strong as my primary kitchen thermo. But it sure is nice to have an NIST-traceable, instant-read thermometer.
10 – Thermoworks RT600C
I like to keep backups of al critical brew day gear. This thermo was my first upgrade from the CDN DT450X. It’s not a Thermapen, but typically stabilized in 1-2 seconds and was very accurate. Most importantly, it was the greatest value in thermometers at $16 back then. The RT600C has been discontinued, but Thermoworks has a few thermometers in the middle range below the Thermapen.
11 – Lighter
For lighting my propane stove, a Dark Star 1.0 with modifications.
12 – Wyeast Yeast Nutrient
Most beers don’t need yeast nutrient. Nevertheless, I add yeast nutrient to every one of my worts and I have never regretted it.
13 – Ice Cream Sample Spoons
You know when you ask for that sample of pear and blue cheese ice cream before ordering the waffle cone of gooey brownie ice cream you wanted all along? Save those sample spoons!. They are ideal for measuring out brewing salts, yeast nutrient, etc.
14 – Whirlfloc-T
I always add Whirlfloc-T to my wort, unless the beer is supposed to be intentionally hazy like a weissbier. If you want to learn a bit more about why label instructions on Whirlfloc-T are often wrong, check out this article from the Internet Archive. And if you want to geek out on finings generally, Podcast Episode 78 with the inimitable Jamie Carmichael will hit the spot.
15 – Hop Candy
I have a rule to not drink beer before I’ve pitched yeast, but sometimes with the smell of malt and hops the urge is just too great. These hop candies really satisfy that urge and tide me over until I can pitch yeast and crack a cold one.
16 – Credit Card
Well, this is a used Visa gift card, but it still works for setting my mill gap at 0.030” (0.762 mm).

17 – Old White Labs Vial Filled with Glass Beads
I gently put a few glass beads into my boil kettle when collecting my first wort, and they help reduce the risk of boilover. The glass beads provide nucleation points for gases lower in the kettle, so that by the time the resulting bubbles have risen to the surface they have collected a lot of the little gas bubbles and are too big to contribute to foam over. You can get them at any craft store or use glass marbles or a boil minder.
18 – Calcium Chloride
I really need to bake this to dehydrate it and then turn it into a liquid solution of known concentration. CaCl is hygroscopic and mine has probably taken on a lot of moisture weight. I compensate by rounding up my additions by 8-10%. Sloppy, but it’s working for now.
19 – Gypsum
Good ol’ calcium sulfate. You can’t make a classic American IPA without some gypsum.
20 – Sauce Cups
Courtesy of the salsa bar at my favorite taco shop, I use these polystyrene sauce cups to measure out my boil additions, including hops, minerals, yeast nutrient, and copper finings (I used Whirlfloc-T). One cup can fit one ounce (net wt., or 28.3 g) of T-90 hop pellets.
21 – Tincture of Iodine
You can’t run an iodine challenge test to check for complete starch conversion in your mash without tincture of iodine. I got this at Walgreens.
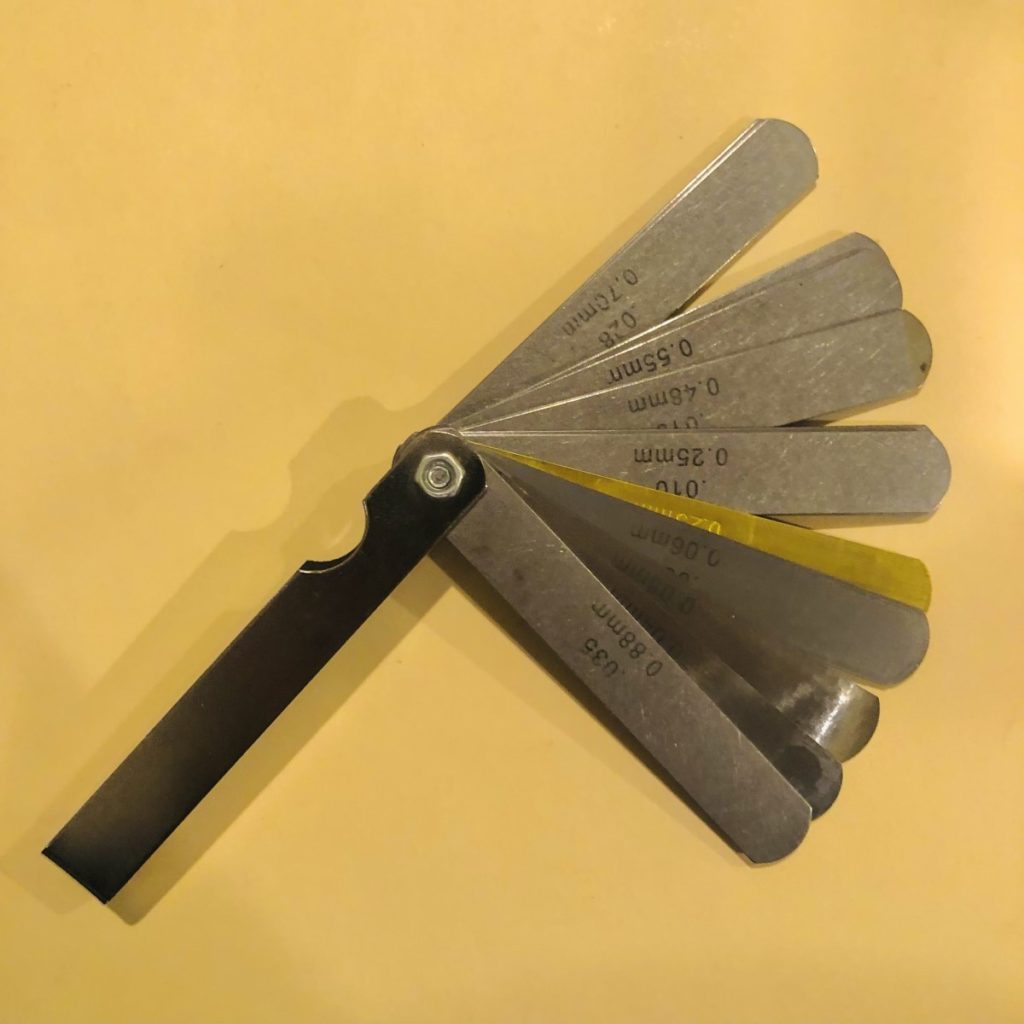
22 – Feeler Gauge
Feeler gauges are useful for setting your mill gap. This tool has a number of metal leaves of various thicknesses that fold out (like a Swiss Army knife) and you can combine them to measure just about any gap you want. In a cool use for this, my son just used this last week to set a 50 micron gap between two solid surfaces and project a diffraction pattern, enabling him to measure the wavelength of a laser! I keep this in the original package so the really thin leaves don’t get ruined rattling around my brew box.
23 – Piece of Aluminum Foil
I cut a piece off of this to cap my PET carboys. I always use a foil cap for the first few days, if I am not doing an open fermentation, and then replace it with a bung and airlock if I will be waiting more than a week to package the beer.
24 – Gerber Multitool
This Gerber Multitool is not the best multitool, but it came free with a flashlight at Costco. The knife holds a good edge for opening hop packages, the pliers work to remove o-rings from corny posts, and it has a bottle opener, so into the brew box it went. I highly recommend having a multitool in the brew box – it’s likely to come in especially handy if you’re ever brewing away from your home.
25 – Pectinase (Pectic Enzyme)
I don’t use a lot of fruits that contribute pectin haze, but when I do I treat them with pectinase first.
26 – Sharpies
A million uses, including labeling fermentors with the beer name and stats.
27 – Pencil
You know the apocryphal story where NASA evaluated dozens of options and spent millions of dollars to develop a space pen that could write upside down and Roscosmos simply selected a pencil? Well, apparently that story is bogus (unless you like electrical fires in a tin can in a vacuum), but clearly the pencil is the most reliable way to take brew day notes, at least for me.
28 – Vacuum Sealer Bag
The obvious use is to put my extra hops or half-used active dry yeast packets in it. This way I don’t need to go looking for a bag after a long brew day. But another unexpected use I’ve found is as a shim to level a hydrometer sample tube. Quite often the thickness of a vacuum sealer bag is the perfect thickness for me to get a perfectly level tube.
29 – Black & Decker Workmate 425
OK, I messed up and numbered the vacuum sealer bag twice. But let me talk about the Workmate. It doesn’t fit in the brew box, but having a portable workbench is an essential part of every one of my brew days.
30 – Campden Tablets
Potassium metabisulfite has many uses. Most commonly for me, there are times I want to have a brew day but haven’t collected water in advance. Campden takes care of any chlorine (and chloramine) in an instant. Crushing one-half tablet in 10 gallons (40L) and stirring it in does the job instantly.
31 – Lactic Acid 88% Solution
Essential for adjusting mash pH and acidifying sparge water. I also use it to pre-acidify wort for kettle souring if I am not using Lactobacillus plantarum, as well as wort for wild yeast captures.
Not pictured
- Cut pieces of blank masking tape stuck to the top of the brew box for labeling things like fermentors.
- Tuff Cuts (trauma shears), which I use for cutting things and because they are not going to stab me like scissors when I am rummaging around in the brew box. Not sure why they are missing, and I need to hunt them down.
Conclusion
I hope this peek into my brew day box inspires you to keep the things you need for your brew day organized in one place.
Let me know what I’m missing. What is essential equipment for your brew day?
And if you want to take a picture of your brew day box contents and send it to use, we’d love to see it. Maybe we’ll even post it and turn this into a recurring feature!
Cheers and happy brewing!
Chino
This blog post was updated at 2021-08-10 16:34 UTC to add the referral link disclosure. It was further updated 2021-08-11 at 01:26 UTC to replace an image that had (expired) gift card details exposed.