
In this post we continue our deep dive into hydrometers. If you missed Part 1 of this article, check it out at this link. To recap, in the first installment we discussed types of hydrometers and how to select one, how to get and prepare a testing sample, and how to test the gravity. And don’t forget to check out our podcast episode on hydrometers with Karl and Angela Hove of Brewing America!
Now let’s dive right into it!
Record Your Measurement
Now that you have your reading, be sure to record it somewhere you can find it, like in your brew log, brewing software, or on your printed recipe sheet. Don’t think you’re going to remember it!
A Bit More Information About Scales
A triple scale hydrometer contains three scales:
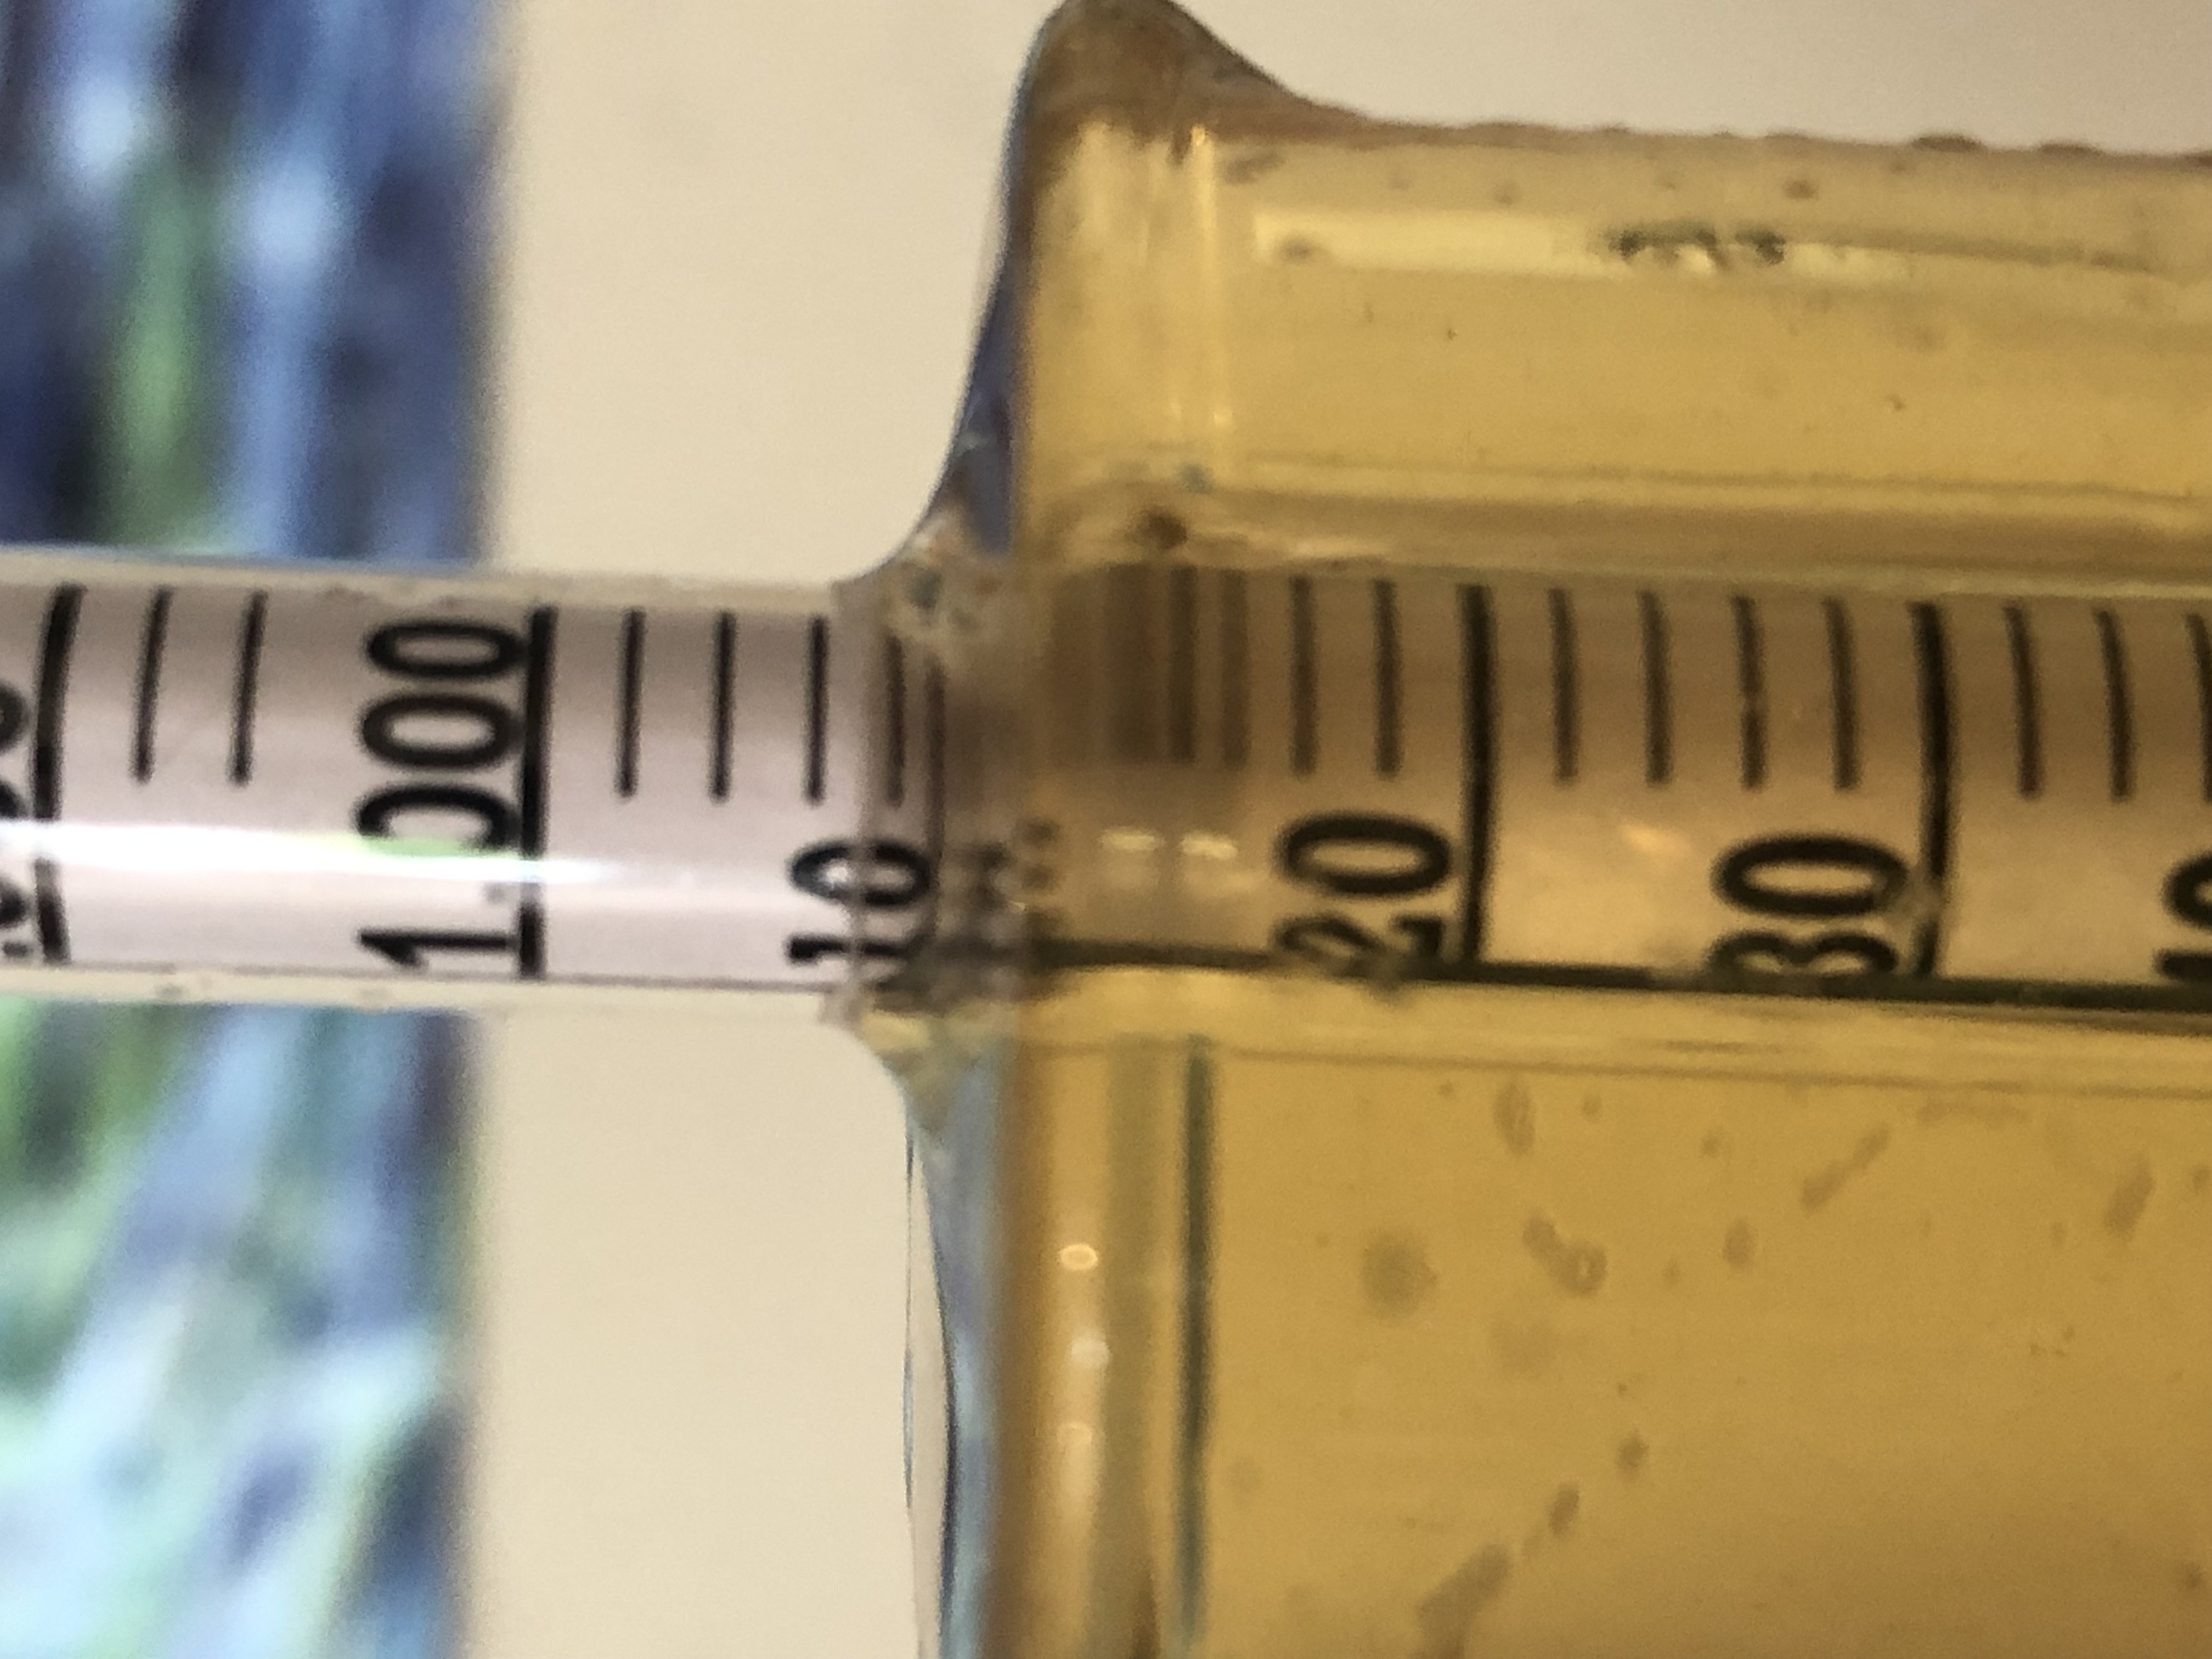
- Specific Gravity Scale – Specific gravity (or SG) is the most common scale used by home brewers. It tells the density of the test fluid compared to distilled water, where water is given a value of 1.000. As more sugar is dissolved in water, the solution gets denser. Thus, the specific gravity scale can tell how much sugar is dissolved in wort, must, or juice. As a matter of convention, the specific gravity is always written with three digits to the right of the decimal point, for example 1.040, 1.120, 0.994. Because alcohol is less dense than water, the specific gravity of fermented beverages can drop below 1.000! Kyle Hove, of high-quality hydrometer seller Brewing America, notes that the gaps between lines on a hydrometer are typically every 0.002 SG – you should buy a hydrometer with crisp lines and high contrast (avoid the really colorful ones) in order to get good readings.
- Plato (or Brix) Scale – This is similar to the specific gravity scale, but instead of being calibrated to the density of the fluid, the scale is calibrated to the percentage of sugar in the fluid by mass. The Brix (°Brix) scale was devised by measuring the weight of sucrose dissolved in water, while the Plato (°P) scale was devised by measuring the weight of the solids dissolved in water. Both are commonly used in brewing, especially in commercial brewing, and are expressed in degrees from zero to 100, with one digit to the right of the decimal point, for example 10.3°P or 5.3°Brix.
Pro Tip: You can multiply the Brix or Plato by four to get gravity points and convert to SG. For example, 10°Plato is 40 gravity points or 1.040 SG. This works great at lower and moderate gravities, and then gets less accurate above 15°Plato.
- Potential Alcohol Scale – This scale is only useful for makers of wine, cider, and mead. It tells you the potential alcohol in those drinks by assuming that the fermented beverage will end up at a SG of 1.000. While it is typical for must or juice to ferment down that low (dry), the scale is misleading to brewers because beer does not ferment that dry, with the notable exception of saisons and Brettanomyces beers, and brewers should not use this scale.
Calculating ABV
When you have your original gravity (OG) and final gravity (FG), you can use those to estimate the alcohol by volume (ABV) of your fermented beverage.
Simple Formula
This simple formula works for most beverages:
ABV = (OG – FG) * 131.25
Alternate Formula
This advanced formula is considered to be more accurate for higher ABV beverages:
ABV = (76.08 * (OG – FG ) / (1.775 – OG)) * (FG / 0.794)
Sample Temp Matters
Did you know that your sample’s temperature affects your hydrometer reading? Colder samples will be more dense than the same sample when it is warmed up.
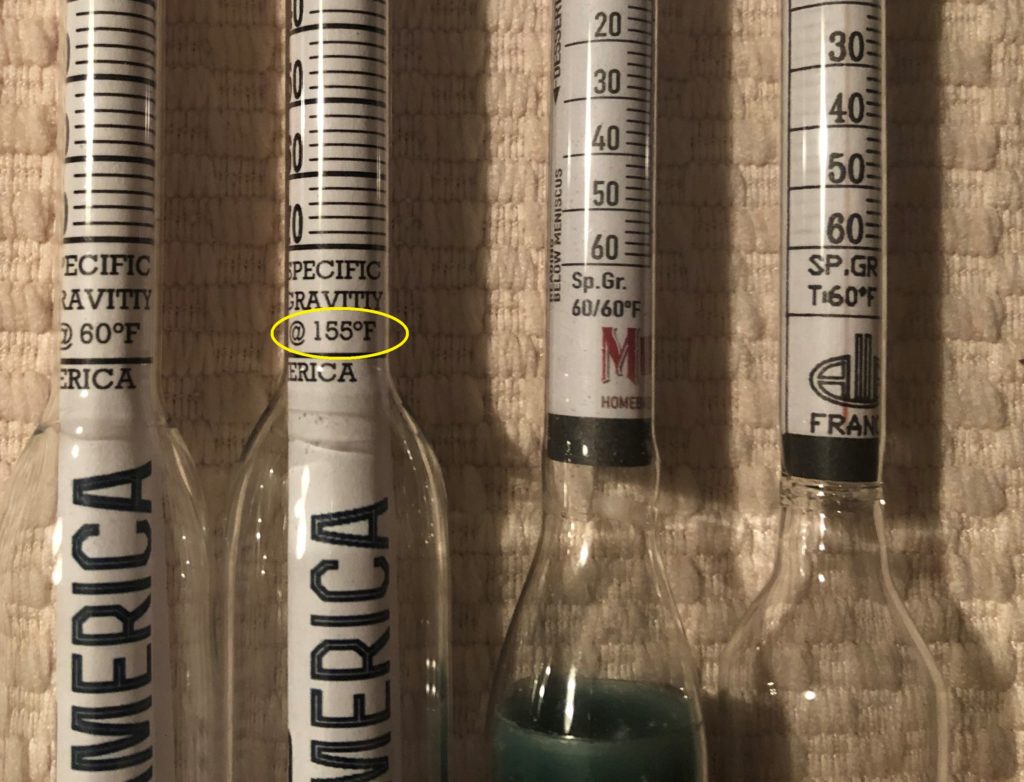
The typical saccharometer made under U.S. and international standards is calibrated to 20°C (68°F). However, there are also many hydrometers, mainly sold in the U.S., that are calibrated to 60°F (15.5°C) for some reason.
For sure, there are temperature correction tables and calculators out there, but they adjust only for the change in the density of the sample fluid, and they cannot properly adjust for changes in the instrument (expansion and contraction) caused by temperature or in the meniscus as fluid density changes. The calibration temperature is on your hydrometer there for a reason. I have found that hydrometer readings are accurate enough if taken within 10°F (5-6°C) of the hydrometer’s calibration temperature, but start to drift and become inaccurate as the deviation increases, particularly when testing hot fluids.
I recommend putting hot samples in the refrigerator and testing it when it is cooled to the calibration temp. However, while this is fine for a final gravity measurement for the log book, this doesn’t work as well for the many interim gravity readings that are taken during the brew day.
One innovative product that I learned about in researching this article is Brewing America’s Hydrometer Calibrated to Mash Temps (155°F/68.3°C). While I have not used this hydrometer, it seems to solve the problem of a brewer who needs to get quick wort gravity readings during the mash to check conversion efficiency, to decide when to stop fly sparging, or for various uses in parti-gyle brewing. Yes, a refractometer can do the job, but it may be better to use a hydrometer because cloudy wort from a mash can make it difficult to get a clear reading on a refractometer,if you plan to use hot wort readings to make brew day adjustments, you probably want the most accurate readings possible when using a calibrated hydrometer.
But My Imperial Stout Wort is Off the Scale
Hey, who doesn’t like a 15% imperial stout now and then? When you have a wort that’s off the charts and your hydrometer is riding so high you can’t get a reading, dilution is the solution.
Just dilute your wort with an equal amount of water, mix it really well, and try it again. If you have a volumetric container like a graduated cylinder, that’s fantastic. But fear not if you don’t – there is an easy way to get an accurate 50% dilution without fancy equipment. Just fill your sample into any glass or jar to a line — draw the line on with a Sharpie or etch it on! — then pour the sample into a mixing vessel and fill the glass or jar to the same line again with water to get an equal amount of water.
Homogeneity Can Be a Problem
OK, I wanted to throw a five dollar word in there. All I mean is that it’s really hard to get a good mix with cool wort and cool water. If you can see that the diluted sample is not well-mixed or you are getting a goofy reading, you may need to heat the sample and cool it back down to your hydrometer’s calibration temp.
How to Test and Calibrate a Hydrometer
Single-Point Test for Calibration
The simple calibration involves attemperating distilled water to the calibration temperature of the hydrometer and checking the gravity. A hydrometer that is in calibration will read 1.000. If the hydrometer is out of calibration, you may wish to do a three-point calibration. A single-point test can only tell you if the hydrometer is off at 1.000, but cannot tell you if the hydrometer is simply offset or is off by varying amounts depending on the density of the test fluid.
If you do not have distilled water, it’s likely that ordinary tap water will be accurate enough.to do a calibration test.
Three-Point Test for Calibration
A three-point test for calibration is the standard established by NIST. It will tell you if the hydrometer is in calibration across the whole scale.
The method for a three-point test involves testing the hydrometer in the lower 25%, middle, and upper 25% of the scale. Besides water, it requires producing two solutions of known density. For a typical triple scale hydrometer (SG 0.990 to 1.170), good points to check are 1.000 (distilled water), 1.080, and 1.125.
Making a sugar solution will require converting the target specific gravity to degrees Brix, which will give you the percent of the weight of the solution that is sugar. Use this chart to make test solutions you need.
SG | Brix | Mix Table Sugar (g) | with Water (ml) |
1.020 | 5.1 | 26 | 484 |
1.040 | 10.0 | 52 | 468 |
1.060 | 14.7 | 78 | 452 |
1.080 | 19.3 | 104 | 436 |
1.100 | 23.8 | 131 | 419 |
1.125 | 29.1 | 164 | 399 |
1.140 | 32.3 | 184 | 386 |
1.160 | 36.3 | 211 | 369 |
What a Calibration Test Can Tell You
Consistently Off: A hydrometer being off by a consistent amount across the scale for reasons that include: (a) the paper scale was not placed in the hydrometer correctly in the first place, (b) the paper scale shifted or moved, or (c) the hydrometer is fine but is too light or heavy and should have been rejected in inspection or re-calibrated.
Off by Varying Amounts: A hydrometer can be off by different amounts across the scale for several reasons, including: (a) a manufacturing defect in the hydrometer or the paper scale; (b) damage to the hydrometer; (c) the paper scale has shrunk.
Using Offset to Compensate for Being Out of Calibration
You can just compensate for a hydrometer being consistently out of calibration across all points by using an offset. For example, my finishing hydrometer is 0.001 low after a three-point test for calibration, and I have to compensate by adding 0.001 to any reading with it. If a hydrometer is off by varying amounts across the scale, I recommend getting a new one.
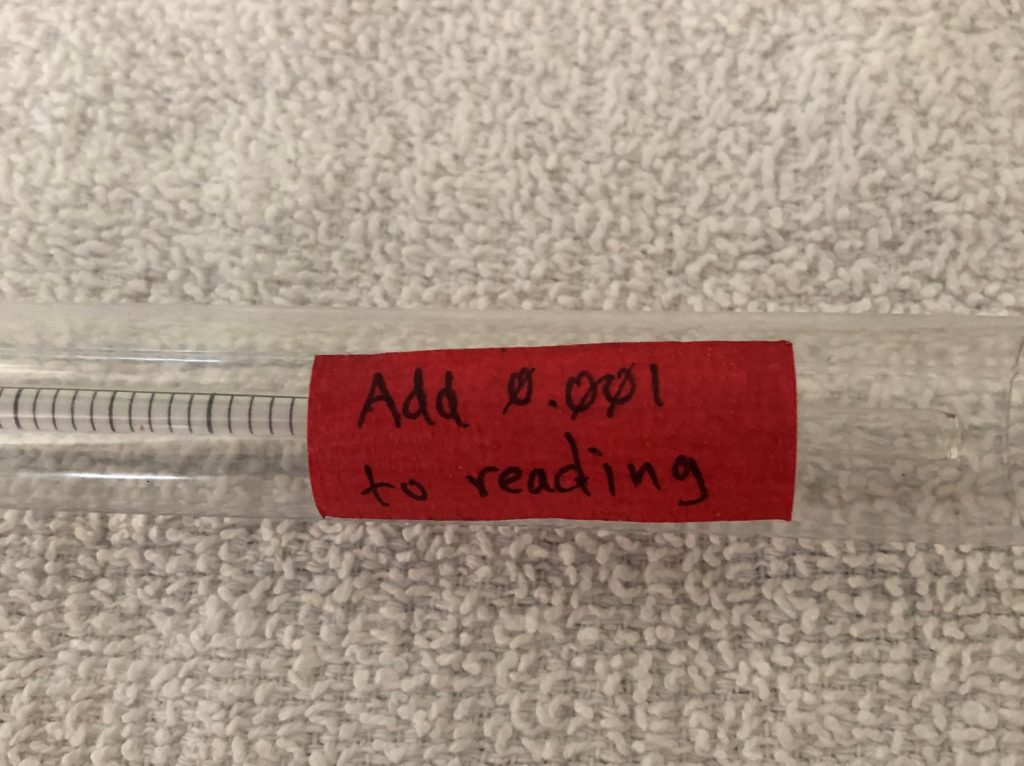
Use a tape label to list the calibration offset on your storage tube 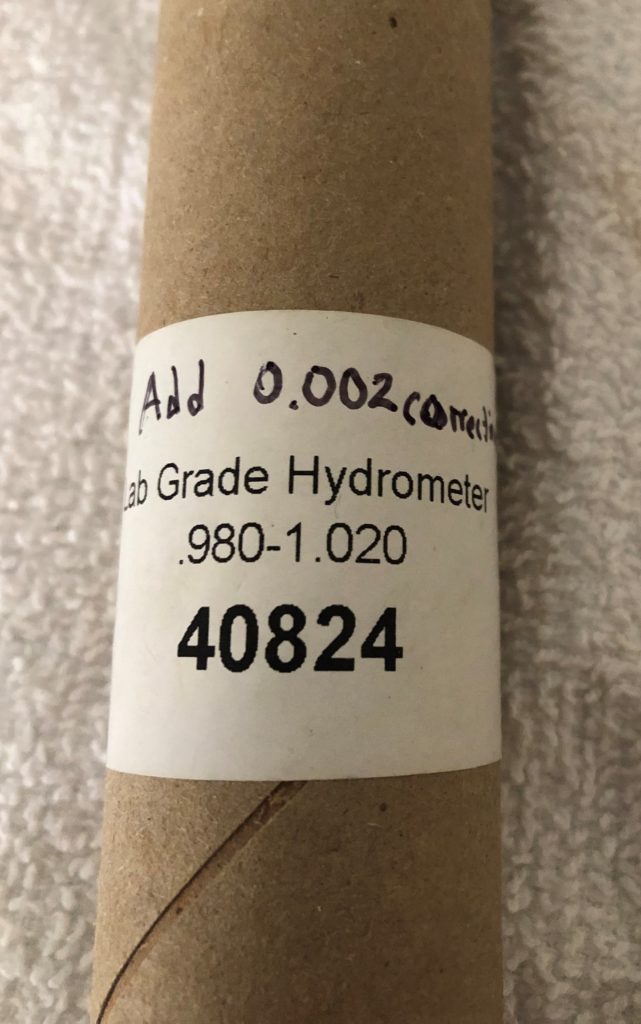
Write the calibration offset on your storage tube
Do not use offset if the hydrometer is off by varying amounts across the scale.
Calibrating a Hydrometer
Believe it or not, it IS possible to calibrate a hydrometer. It works best for a hydrometer that is consistently off across the scale by a little bit. So first I recommend doing a three-point calibration to make sure the hydrometer is not off by varying amounts across the scale. The calibration is not as simple as turning a screw, but it doesn’t require a lot of skill either:
If the hydrometer is reading too low: add weight by applying a tiny amount of nail polish to the top of the bulb.
If the hydrometer is reading too high: reduce weight by shaving a little bit off of the bottom of the hydrometer bulb with a fine metal file.
How to Not Break a Hydrometer
I’ve never broken a hydrometer. There, I’ve said it. I know I’ve jinxed myself now – but until I break one I can speak with authority on how you can avoid it:
- Treat the hydrometer like it is a delicate scientific instrument made of thin glass. Yeah, I’m a comedian. But seriously, don’t just throw the hydrometer into a box of brewing stuff.
- Have a separate testing station set up a bit away from the brew day action so you don’t knock over the hydrometer or set something heavy on it. In the garage, I use a portable workbench. When I’m in the kitchen, I set up my station on a little-used counter that’s away from the action.
- Keep the hydrometer in its storage tube until needed.
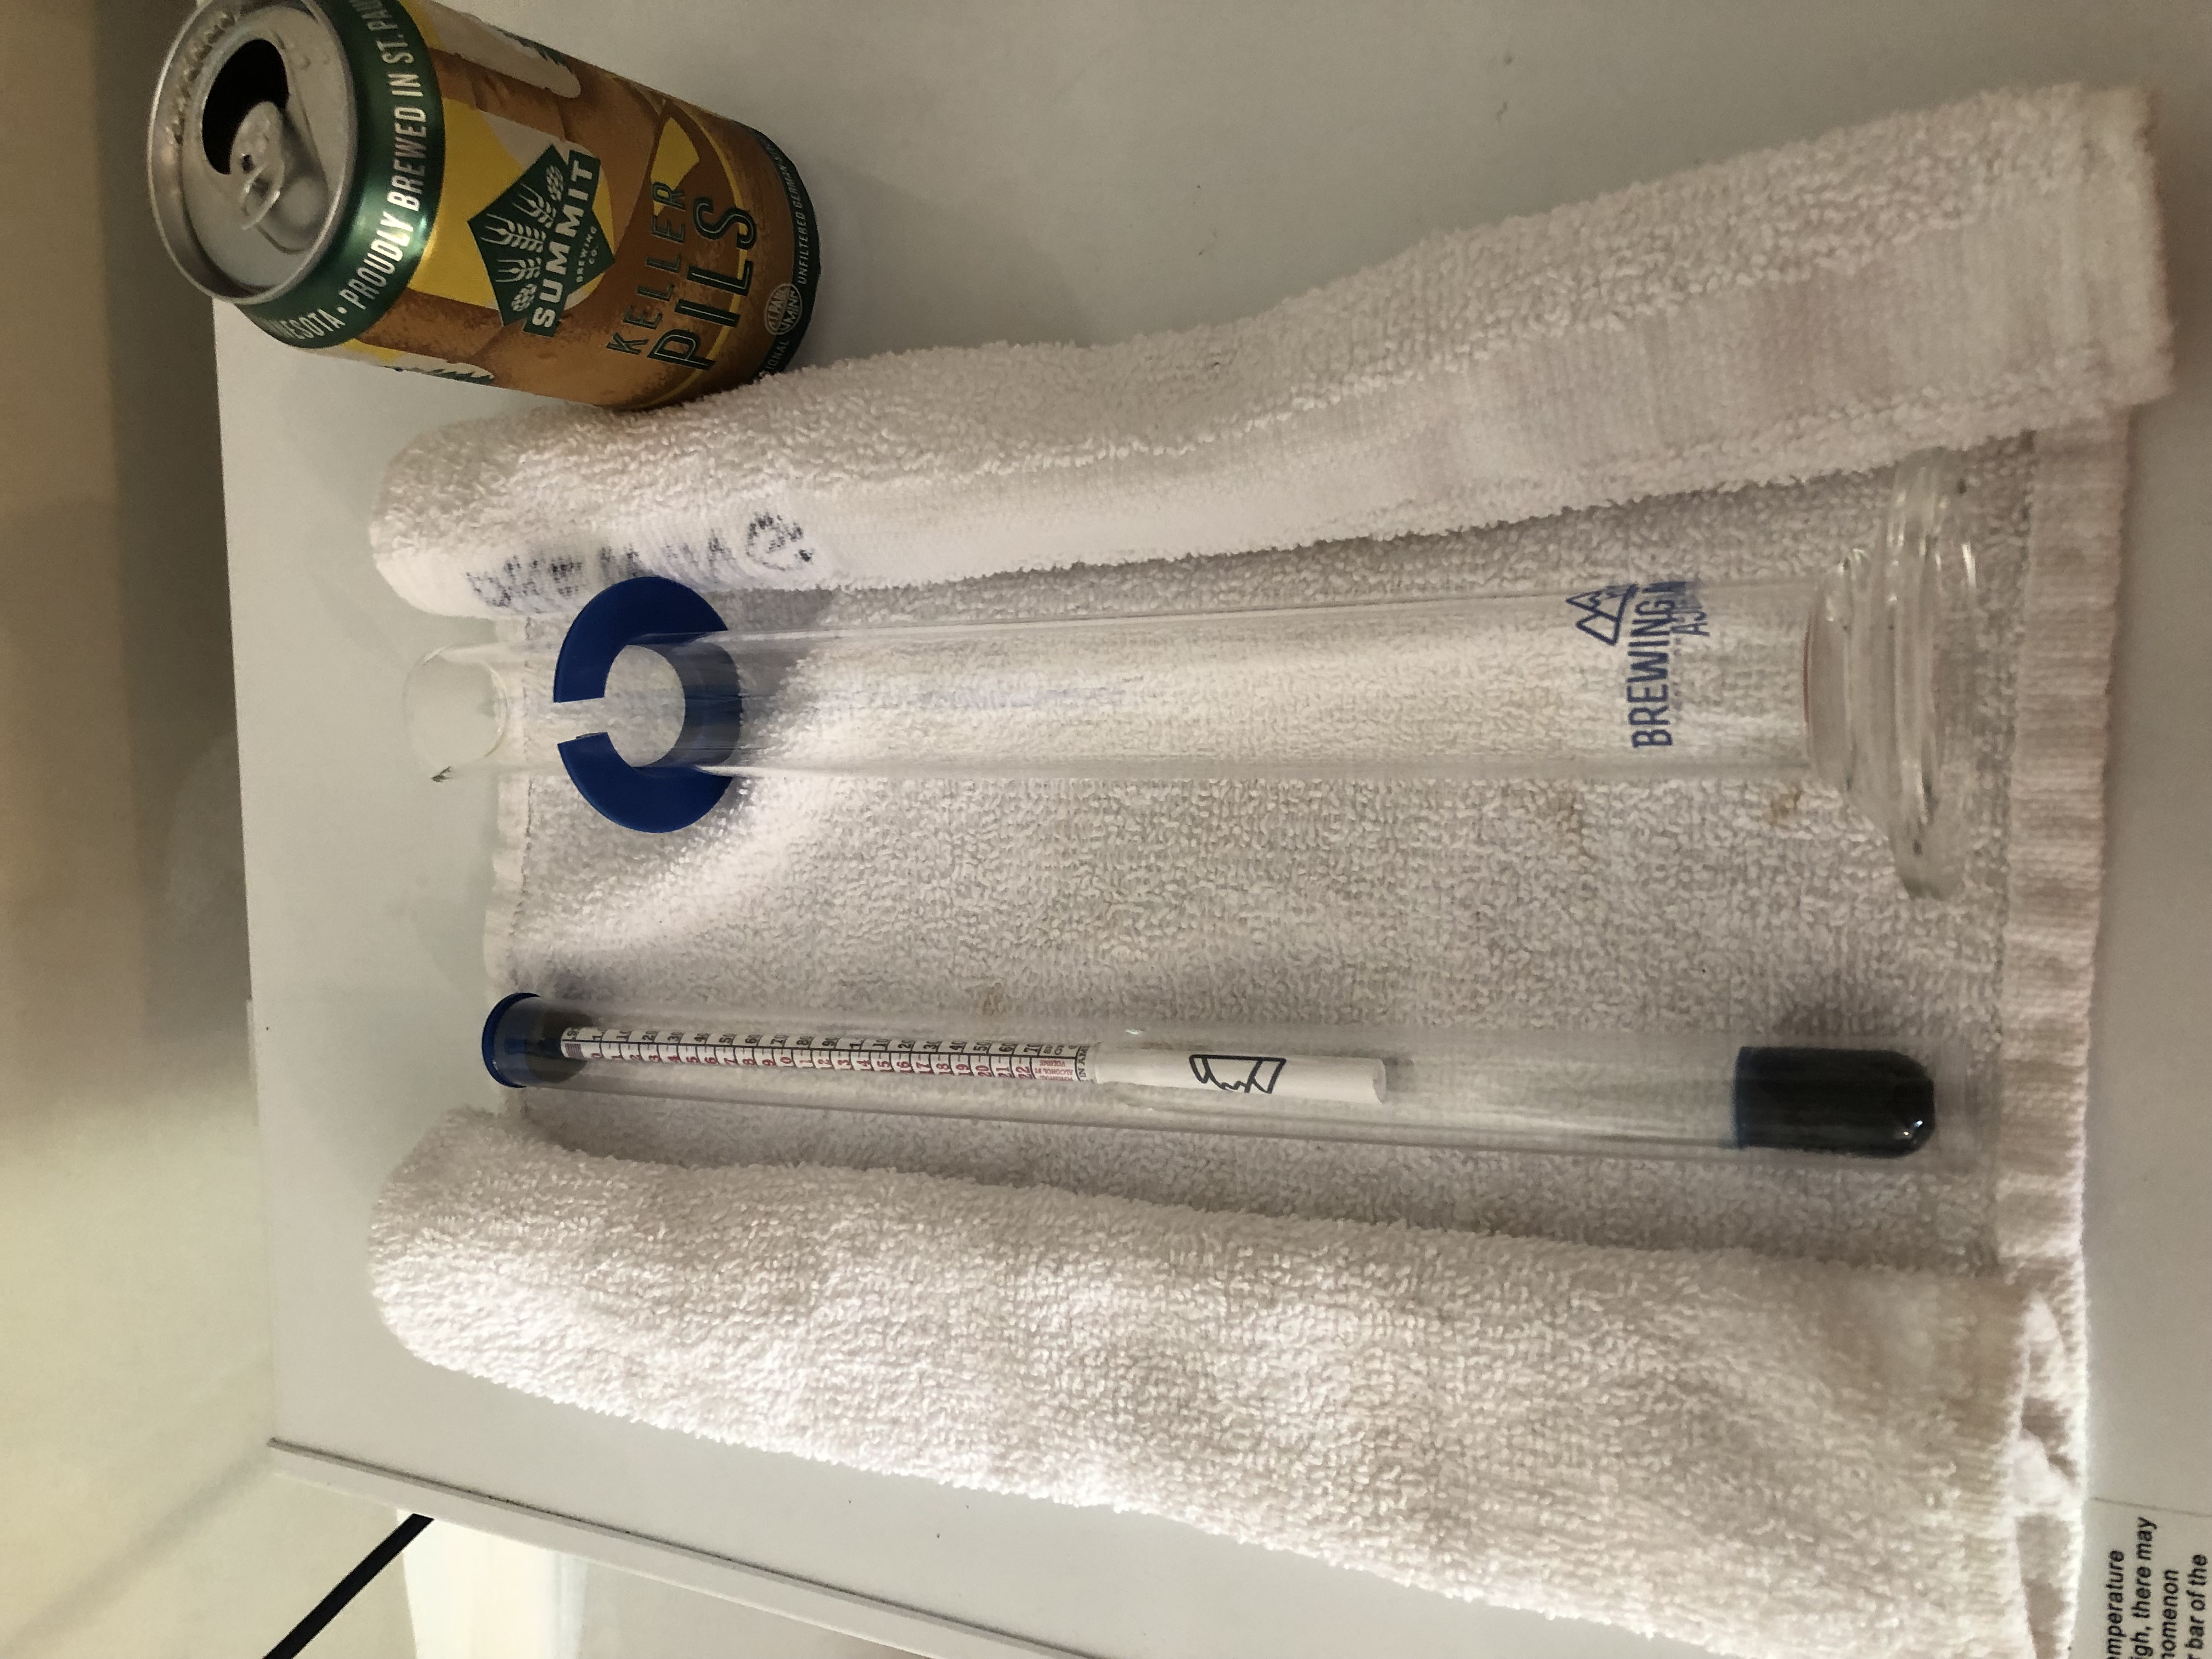
- Put a towel at the testing station and roll up the ends so the hydrometer can’t roll away if you set it down.
- Don’t leave the hydrometer floating in a sample. That’s how they get knocked over. Dry it off and put away in the storage tube, or at least lay it down on that towel.
Common Mistakes to Avoid
Breaking a Hydrometer: Well, no duh that’s a mistake! See my tips on how to avoid breakage.
Dropping the Hydrometer into the Fermentor: This is a terrible practice for many reasons. Dropping the hydrometer in can cause breakage. Shards of glass in your beer are never good. The dropping action causes wort or beer to climb onto the hydrometer stem, possibly throwing off its accuracy. Furthermore, kraeusen will also throw off the accuracy of the hydrometer. Finally, between the kraeusen and sidewalls of the fermentor (even transparent ones), it’s impossible to get up close and personal, at eye level, with the hydrometer, and get a clear read of the meniscus.
Unevenly Mixed Samples: It’s a common phenomenon that you can’t get a homogenous mix and a representative sample when mixing sugar into cool or room temp water. Did you add all of the sugar into very hot water and ensure it was all mixed thoroughly? Or was that extra kilo added later?
Testing Hot or Ice Cold Samples: Samples need to be within a reasonable range of the hydrometer’s calibration temperature. Sample temps should be brought within 10°F (5-6°C) of the hydrometer’s calibration temperature.
Bubble Trouble: Bubbles from carbonated samples, including “uncarbonated” beer will cling to the hydrometer and cause it to read high. De-gas your samples before testing them.
Riding High: Sometimes the sample is so trubby that the hydrometer is practically resting on a bed of sediment. This will throw off the hydrometer reading. Try again on a clearer sample.
Conclusion
Hydrometers seem simple, but there is an incredible amount of science behind them. They are the only way to get a direct measurement of the density of your beer, wine, mead or cider. While hydrometers are easy to use, a little bit of knowledge will help you use these scientific instruments with the greatest of accuracy.
If you missed Part 1 of this article, check it out at this link. I hope you enjoyed this deep dive into hydrometers and how to use them. If you have something to say or ask on hydrometers, please leave us your contacts below or use the contact form.
Helpful Links
- British Standards for Hydrometers, BS-00718 (1991)
- National Institute of Standards and Technology Circular on Testing Hydrometers
- Brewing America, a source for American-made, precision, NIST-traceable hydrometers
- How to Use a Hydrometer at Hazy and Hoppy blog
- Information about ABV formulae from Brewers Friend