This is our annual Home Brew Hacks Episode. Happy New Year and may you all have a great 2021. I would like to thank all of our listeners that submitted their hacks. There are photos that are parts of some of these hacks head over to Http://homebrewingdiy.beer and check them out.
The website is now live! Check out more detailed show notes and images at https://homebrewingdiy.beer
Support this podcast: http://patreon.com/homebrewingdiy
Try BrewFather for free: https://brewfather.app/?via=homebrewingdiy
Scrubber Duckys: https://www.scrubberduckys.com/store/c1/WWW.SCRUBBERDUCKYS.COM
The Brew Bag: http://www.brewinabag.com/?aff=26
Social
Follow the show on Twitter, Facebook, and Instagram: @homebrewingdiy
Email feedback to podcast@homebrewingdiy.beer
Music:
Intro Music: SUNBIRDS by BOCrew (c) copyright 2012 Licensed under a Creative Commons Attribution (3.0) license. http://dig.ccmixter.org/files/BOCrew/38854 Ft: THEDEEPR / THECORNER / feat : FORENSIC
Not enough Horsefeathers by Fireproof_Babies (c) copyright 2008 Licensed under a Creative Commons Attribution (3.0) license. http://dig.ccmixter.org/files/Fireproof_Babies/13115 Ft: duckett, kulimu
Paper Planes – Durden ft. Airtone by DURDEN (c) copyright 2016 Licensed under a Creative Commons Attribution (3.0) license. http://dig.ccmixter.org/files/DURDEN/55041 Ft: Airtone
Brewfather ad Music:
Kalte Ohren by Alex (c) copyright 2019 Licensed under a Creative Commons Attribution (3.0) license. http://dig.ccmixter.org/files/AlexBeroza/59612 Ft: starfrosch & Jerry Spoon
Scrubber Duckys Ad Music:
Music:
Jeff II – Liquid Demons
Link to the song: https://youtu.be/UkRIKiBJ5Oc
Show Transcript it is AI generated and will have many errors.
Colter: On this week’s show it’s our annual Homebrew hack show where we take all of your input and emails. And tell us about your coolest tipper trick or piece of equipment that is going to make your brood easier. It’s our final show of the year. And I invite you to stick around for our annual Homebrew hack show this week on homebrewing DIY
And welcome back to homebrewing DIY the podcast that takes on the do it yourself, aspect of homebrewing, gadgets, contraptions, and parts. This show covers it all on this week’s show. It’s our annual Homebrew hack show where we’re going to talk about all of your tips and tricks. Or that piece of equipment that is makes your brew day easier.
These are user or listener submitted requests. And so I’m excited to read those with Erin Bandler, who is joining me for the show. But first I’d like to thank all of our patrons over a Patrion it’s because of you that the show can come to you week after week. I’d like to also point out that it is the end of the year.
It’s the end of 2020 it’s the final day. It is. New year’s Eve. And I want to thank everyone who has supported and listened to this show over the year of 2020. I think that as far as the homebrewing hobby goes, it’s been a crazy year and it’s just been a crazy year in general and glad to see. 2021 ushered in and what it will bring and hopefully what it will bring for all of us in the home brew world this year is actually having the ability to go to Homebrew club meetings, again in person Homebrew con, and all of the great events that happen around homebrewing.
I’m hoping they all returned this year in 2021. It would make me very, very, very happy. Another way to support the show is to head on over to coffee. That’s coffee.com. kao-i.com forward slash homebrewing DIY. You can give a one-time support versus monthly. And also if you write us a review, if you head over to Pacis for.com or if you’re on Apple podcasts, just scroll to the bottom of your app and leave us a five star review.
The last way to support the show is head over to our website, homebrewing, DIY dot ear, and use our sponsor links. Thank you to all of those in the month of December that did their Christmas shopping@adventuresandhomebrewingorboughtabrewinabagorabrewbagfrombrunabank.com and. Also, we are now have affiliate agreements with the keg co.
So if you’re looking for a high-end kegerator for your house, I would highly recommend checking out. Kitco they’re really, really cool. Well, Other than that, I think we’re going to just jump right into the Homebrew hack show. It’s going to be a long one. So let’s just get going and we will skip feedback at the end of the show and just head right into the next year.
So I have Aaron Bandler joining me, and we’re going to read all of your home brew hacks.
Well, let’s just jump into our Homebrew hack show. So just a quick overview of what the show is, is basically we do this show every year at it’s the last show of the year, and this year happens to be on new year’s Eve. So kind of cool that it’s landing on the last day of the year, but what this show is and consists of is really just you.
You’re my listeners and people that we talk to on all of our social media channels. Telling us what your cool tip or trick or that piece of equipment you have, that really makes a cool shortcut for your Homebrew day. And that’s what we’re going to do. And so we’re going to spend the next, however long it takes us to get through these.
We’re going to read these so that maybe you could learn something and kind of discuss what we think of them as well. So, We’ll we’ll, we’ve got some emailed. We got some from social media and between those two, I think we’ll have plenty for the show. So sound good to you, Aaron
Aaron: sounds great.
Colter: Awesome. So I guess let’s just jump right into our first hack.
I’ll start and we’re going to get our first one from Eric coming and this one’s via email and he said, hi, Colter. My one hacky thing that I’ve put together is using a wellness bulkhead and a cheap fitting for my brew hardware to put a gas ball lock on my, on a gas ball lock port for mentor on my fermentor.
It makes an easy blow off, and it also is easy to push CO2 from my fermentor to, to the keg, to purge it. Also, I can use it to transfer from my fermentor to my keg and do it without. Oxygen. So, and he actually sent me cool pictures here where he’s got it. It’s a, it’s a kettle lid and it’s a stainless steel kettle lid or fermentor lid that he has here.
And he actually has drilled a hole in the top right in the center of it. And he’s got a ball lock valve on top of it. This is something that, that I I’ve done with my plastic fermentor back in the day. Also something I. Currently do, but since I ferment and kegs, now it’s kind of built in, but the idea is you’re getting the same thing.
Obviously I think his fermentor is larger than my five gallon keg. I think he’s probably got a seven or 10 gallon fermentor here. And so, you know, adding a ball lock port, I think is always a great hack when it comes to wanting to do oxygen free transfers, have an easy blow off tube. Just like he said.
And also I think that it’s, it’s a great thing to have when it comes to just, you know, not ha not dealing with airlocks. I, I’m not a big fan of airlocks in general. So I think that having a blow off tube is just a better way to. I’m with you there. And actually I did almost the exact same thing first with my bucket for men or lids.
And then once I upgraded to the stainless steel brew buckets, I did it with that. But yeah, same thing. I will say. One of the things that I’ve found is that. Um, the stainless steel buckets and the plastic buckets, they don’t hold pressure nearly like a keg does. So if you’re doing that and make sure that you’re using a spigot at the bottom of the vessel, whether it’s the bucket or that stainless, cause you’re not going to be able to get enough pressure to push your liquid up through a floating dip tube, or like a stainless dip tube or anything like that.
So, Uh, it totally works. As long as you’re relying mostly on gravity to do the actual transfer of warts. I couldn’t agree more. And specifically, if you’re doing things like hazy, IPA’s in a setup like that, you’re going to struggle with that spicket clogging, and you’re not going to be able to get enough pressure to kind of push the hops through either.
And so that’s actually a problem I had with my old plastic fermentor that I had put a. A ball walk valve. And in the top of, I actually struggled to get hazy IPA’s out, which is the beer. You totally want to have oxygen. Right. And so that’s why I pushed over to kegs and I hadn’t been using kegs. And just as a matter of fact, Pushed over a hazy IPA in your garage today?
I just, I like, you know, I just wish kegs were like came in a seven gallon version. You could actually get 10 gallon kegs. You can get corny kegs that are taken. I know you can get 10 y’all want like a seven gallon keg though. Yeah, that would be nice. I think they, I know they come in like one gallon, 2.5 gallon, five gallons and 10 gallons.
But I think a 7.5 gallon would be nice actually. Yeah. All right. Well, that’s, that’s a good one. Yeah. That’s uh, I agree with that. I’ve switched over all of my, uh, All of my door, manners to ball lock style, blow off things as well. So I’m with, um, was that from Eric? That we just heard that from him, Eric coming, and thank you very much for submitting your Homebrew Hakka.
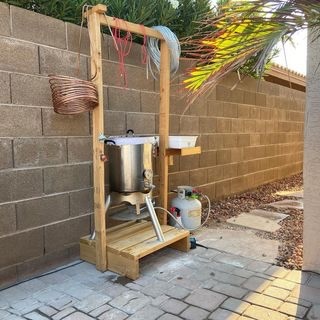
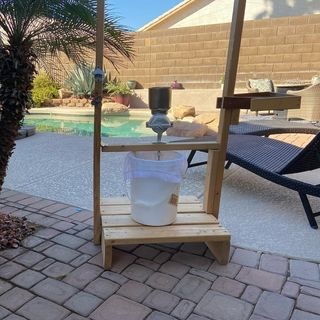
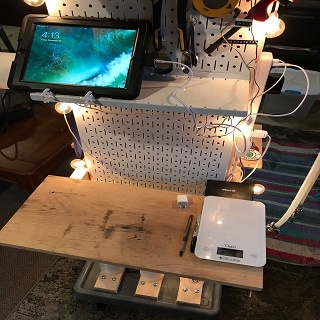
W w what’s the next one that you’re going to read off? Okay. So the next one here is from Fred Coleman. Who’s handle is at blind brew guy and he sent us some pictures of his setup here that he looks like he built. Um, and at first I thought it looked like a beer brewing guillotines type of contraption.
Um, it’s basically a wooden frame that he’s built, uh, over a platform and he can kind of, it’s like his Batman utility belt of his home brewing setup here. It’s got a thing for everything. So Fred writes here, um, He says, okay, here’s a picture of the Bruceton I built during lockdown this spring. Yeah. I feel yet it’s built from wood.
I didn’t have access to metal or a welder it’s made my brew day more convenient and the cost less than $20. He had a lot of wood on hand. I guess the stand at the bar burner sits on is built high enough so that the word gravity flows from the ball valve on the kettle to the fermentor. So he doesn’t have to use any pumps or siphons.
Can just gravity transfer, kettle, fermentor, uh, and then there’s an upright crossbar.
Which he uses to lift any other equipment for that. And there’s a pulley ratcheting. Totally. I use one of those as well. Those are great. Um, so they can lift it out and hold, maintain tension on the line hooks to hang the path brewing stations. Oh. And then he also adds that he added a grain milling station to this as well.
Yeah. One thing that I would say. That I like about Fred setup is the, the ability to have that kind of set up where it’s portable. But you able to still lift the bag out? I right now, because I’m doing things I’m using a electric all-in-one electric brew system. I’m doing, I brewing a lot more indoors. I don’t really have a setup to like lift my bag out.
I am brewing smaller batches, so it is a little easier, but there’s still some like, I have to hold the bag until it kind of drains away and then I’m moving it over to a bucket and then squeezing my bag over a bucket. So I don’t make a mess. Yeah. It definitely adds, I think for having a trend to have a portable outdoor system, I mean, I’m looking at the pictures.
I’m not sure he’ll post these on your website, but it looks like Fred lives somewhere very warm where he has mostly a Palm trees and things like that. So he, um, It doesn’t have, it’s not even like you can brew it under a tree and hang the bag from a tree or something like that. He’s he needs to have somewhere to hang his bag.
So yeah, definitely for me, I, I brew underneath my patio. I have a, I have a second story deck. And so that’s where I brew under. That’s where I hang my bag from. But definitely like, that’s the only place that I’m brewing right now is cause that’s where I can hang a bag. Yeah. And so for me, and you’re brewing bigger batches, right?
You’re brewing like 10 gallons. And so to just. Man handle and lift that much grain is impossible. You couldn’t even do that. Oh yeah, yeah, yeah. I can’t even do it without a two to one totally. On the 10 gallon that, yeah, exactly. And so for me, where I’m max lifting out 15 pounds of grain, and then when it’s wet down, it’s probably twice that it’s still less than 50 pounds I’m out of there.
You’re probably looking at hundreds of pounds coming out of there. Yeah, so this, so I’m, I’m looking at Fred setup and I’m wondering it looks so he says that it’s surprisingly lightweight and that’s cool. And so I’m, I’m wondering. It looks, it doesn’t look like there are any wheels on this thing. I was picturing kind of like, I was picturing it like a brew cart, like roll it out of the garage, out onto the patio, but it looks like it’s, according to Fred, it’s light enough that he can, I guess, lift it and move it out to where he needs to, but it looks pretty slick.
Yeah, that does look pretty slick. I will put wheels on it cause I’m lazy, but yeah, same here. Same here. I would totally throw wheels on it, but I will say if you sent pictures, I will post pictures from your different hacks onto the show notes on the website, homebrewing, DIY up here. So if you want to see what we’re talking about here with Fred setup, just head over to the website, you can check it out.
I’ve got the next one. It’s from Gabe, Gabe Weiss. And this is a long one. So we’re in for a long one. So. Okay. And even says there’s a lot of stuff here, so don’t, I won’t be offended if you don’t share it all. But thanks as always for the great show. I’m a dad with young kids and time is a premium. I’ve gone to a 30 to 40 minutes.
Where did, does that sound familiar to anybody who’s recording this episode? It sounds familiar to me. Almost no boil, no chill. Add the grain. When the water gets to about 135, leave it in the, in. Until the war gets to be one 70 and then you get 10 to 15 minutes of more efficient mash time, uh, for free.
Bring the war to a boil, turn it off, add hops, and then hop bursts calculate as much as 20 minutes for ICU’s. Wait two hours for the war to drop to one 70, add Whirlpool, pull, hops, and stir. If you want, wait for an hour for everything to settle down and transfer to the fermentor. It will still be hot enough to heat and sanitize and stay cause that’s around one 40, leave it overnight to chill and then add yeast.
This is a, this is also great with a stainless steel for men, or it saves hours of active time on my brother. That was my question was, does this, this actually does it actually save time? Not to chill your wart, but according to Gabe here, it does. I mean, look, if you do it, I believe you, but it’s. I I’ve heard of styles like this, and I call this brewing method, the sourdough method.
And the reason is, is that this is very much like the same processes, like baking a loaf of sourdough bread. Right. Do you like a little bit, and then you wait a while and then you come back later and you do a little bit wait, but you’re not actively brewing, right? You’re not having, you’re not spending a lot of time standing over a boy.
It doesn’t tell you all your focus for hours at a time saves hours of active time on brew day. So it’s still a brew day, but it’s like, He can, he can do a thing and then go pay attention to, you know, the more important things in life for some time. Yeah. You know, you’ve got a wife, you’ve got kids, you’ve got things to do.
I, I don’t know if, if his home life is like mine, but there’s schedules with children. There is. Things that you need to do and need to be there. And obviously, you know, you, you also need to spend quality time with your wife and your, and your, and your children. That’s just part of life. And so it is hard for me to, you know, take an entire four to six hours out of my day and have it be solely focused on brewing.
And so I think that these are all great things that you can do. I can say that when we’ve looked at. And obviously from reading things like brew, lots of IP, uh, their entire short and shoddy series. If you look at things like, uh, other podcasts out there that have talked about doing these types of shortcuts, as long as you have good sanitation, I think that there should be no problems with doing a lot of this stuff and still being able to make good quality beer.
Is this what I would do if I was making a competition beer? Absolutely not. I would then go to much more strict processes and more focused. But if we’re talking house beer that I’m going to have laying around and, uh, you know, a nice pale ale, hell yeah. I would totally do all these things. Yeah. Well, so I’m, I’m reading again through his explanation.
So he says bring it to a boil and turn it off. Add hops and then, you know, calculate as if it was a 20 minute addition, but you’re actually letting it, it’s basically a two hour hop stand is really what he’s describing here. Yeah. Yeah. And that, that, and that makes sense because I understand he’s trying to figure out I, I’m not the biggest fan of IBS.
Don’t get me wrong. Your brewing software pumps them out and all that stuff. And you do want to know how bitter things are going to be, but in the end, it’s not really something I totally trusted I’d use or not like end all be all of everything. Uh, so second part, keep going. Yeah, we’re going to keep going.
And this is a long one. So Gabe second part, uh, he has a two 40 volts, uh, 5.5 kilowatt heating element, a heaps from room temperature to mash temperature in 15 to 20 minutes. And same for boil temps. And I have to say. Two 40 in your garage is not that expensive for, we’re going to talk about, you know, if you were going to run a gas line into your, into your garage, two 40 is going to be way cheaper, right?
If you’re going to. Do other things like it, give yourself, think about it this way. A year worth of propane trips is probably the equivalent of the cost of adding two 40 to your garage. Yeah. And then the most expensive part when I did it was the GFI breaker, which I will. Say for your benefit of your listeners, get the GFI breaker.
It could save your life. I’ve already popped mine twice on brew day. So it’s, I’m glad I paid a hundred dollars just for that part. But that one part is, was $100. That was the most expensive part. And I had it done. I had a circuit installed breath, licensed electrician. And, um, it was not that expensive.
Yeah. We’re talking to a couple, a couple hundred bucks total, and yeah, if you’re brewing at any cadence that let’s say a couple of times a month, the amount of propane you would go through in a year would cover what you’re going to do here. And then you’ll never buy propane again. And every brew day costs you in the pennies of electrician Tricity.
So I would have solar power and it’s free. Yeah. Which is your setup. Right? So it’s something where I look at. The two 40 is something that I agree. It’s going to save you time. And it’s also going to, it’s just going to save you a lot of headaches and save you on propane. Uh, number three, he said get a $20 posted scale with a remote display, with a hundred pound capacity.
Put your kettle on it. And zero out before adding water water is 8.34 pounds per gallon at 60 degrees. And then can be easily adjusted for the actual water temperature, a pint, a pound the world around that’s a quote, a pipe to pound the world around. Yep. And, uh, pretty close. At least for us pints. The brewed up episode reminded me of this one.
The scale is also very useful for figuring out how much beer ends up in the kettle after fermentation, but requires. A hydrometer reading. So I’m actually, Kevin, can I comment scale here? I think this is brilliant. I did not realize that a postage scale with a hundred pound capacity only costs $20. Um, I might get myself one of these because I use the, I use the scale.
I mean, just today, you and I were transferring the keg and I, when I’m transferring from one kid to another. I’ll usually put the club that I’m transferring into on a scale, not just so I can see if the numbers are going up. I know that if the numbers stop going up, then the line is clogged or something, or maybe I’m at a gas or whatever.
But like, I use this a lot for, um, I use the old weight trick a lot here, but I have a little scale kitchen scale with like a 20 pound capacity. So it doesn’t really, it’s not reliable. I think this is great. I would totally do this. Yeah, I add that to my setup. Yeah. And, and that, so one of the things we talked about in the brewed up episode, I had, uh, I had, uh, the ladies from that podcast on the show, just in case you didn’t listen to Aaron.
Cause I know you don’t listen to all my episodes, but the idea is that when we were on that episode, we were talking about doing markings in your keg and that like the gallon jugs don’t really mean they’re a gallon and how I figure out measures that are going into my. Kettles that don’t have markings on them, which mine currently does now.
But. I think weight is going to be even better just because, you know, it’s true, right? You’re not, you’re not relying on somebody else’s measure, you know, Hey waterways this much at this temperature, it is what it is his, he says at the end here, and you can do it for, you know, post fermentation beer, but requires a hydrometer reading.
So whatever your final gravity is, multiply that number times. Your volume or whatever at times, you know, there are times you’re mass, I guess, and that’ll give you your volume. Right. So whatever it is, 10, 10, 1.01 times, whatever mass is. Um, well we know water’s 1.0, right. So you’re just adding the, the, the, the final gravity of sugar too.
And you’re right. So you said account, that’s how you account for the, uh, The post fermentation or even the pre fermentation, whatever, let’s say you had cancer for warrant or beer versus yeah. And to me that is one of the things that is cool about weight to me. That’s also, when we talk about, when people talk about trying to figure out how your kegs are empty way, um, you’ll know.
Right. And so that that’s also kind of another hack is how much beer is left in my keg. Well, if you know how many, how much it weighed going in, you know, how much it’s going to weigh coming out. Right. So. Kind of another trick you have there. Uh, so number four, we have CO2 is hard to get in COVID times I empty, I say the empty kegs and use them to purge kegs that I’ve just filled using a jumper made with two gas connections.
Yep, totally clever. I also tried adding, just. Uh, just adding sugar and water in an empty keg and letting the yeast in it produce extra CO2 and drive a keg at the beginning of the lockdown. It worked well, but I’m not sure if I fear and I’m super worried about it. Oxidizing. That is, that is, that is not that’s.
It’s a totally new one. Um, I commend you game for your ingenuity there. Yeah, that is
it. Here’s one thing. A yeast is actually a scrubber of oxygen. So I will actually say that if you have oxygen in a keg and you have yeast in a keg and you’re using it to actually purge it, It will actually eat every bit of oxygen that’s in there during the fermentation process and produce CO2 from it.
So, right. I think he’s talking about adding it to like keg filled with bear. Yeah, he’s taking it. He’s taking it, adding some, some shit or water with yeast to eat up and it would actually eat all the oxygen in there as part of doing it. It would become a, a oxygen free environment. I mean, essentially, that’s what you’re doing when you bottle, right.
You’re, you’re scrubbing all the oxygen out of the bottle. He’s just doing it at a larger scale. That being said, I don’t think it’s the most efficient way. When, when you think about the price of CO2 and. You know, CO2 is a little harder to come by and see COVID times. But I think we’re kind of past that part.
I realize it was hard to come up, put in a plug for Tom’s brew shop. Like what Colorado supplying me with CO2 for that I pay for. And I’m not getting paid today. Yeah. But they also have the ability to fill in-house there. And so, yeah, we were lucky to not have much of a shortage. There was a pretty big CO2 shortage nationally, just because of COVID.
Yeah, mid summer past that
though. I have a 22 with like once every two years, unless you have a leak. All right, Gabe, we’re still on to you. Number five, save your yeast.
Cakes for the next batch a bitch. And also when you buy commercial beer from your local craft brewery, that’s fresh. It’ll probably is probably not filtered and probably has yeast that you could harvest. That’s nice for trying out new yeast, new yeast, but you may never get to know what the yeast is. So what it makes good beer.
I, I. Couldn’t agree more when it comes to harvesting bottle. Drags is always a great way to try out new yeast, especially I, if it’s a beer that you like, I think that that’s how a lot of people get ahold of the Bell’s yeast specifically. Cause they won’t sell it to you. But you can, if you have like a two hearted L I know you can harvest the yeast out of back, cause it’s an unfiltered beer, but there’s many, many different types of yeast you can get from bar bottle drags.
And it’s always a great experiment to have. Cause, you know, it came from a brewery love. So I totally agree with that. Also just saving yeast from old batches. I’ve done that. For multiple generations and have I’ve actually got as many as 10 or 12 different generations harvesting from batch after batch.
Until I started to see a big change in, you know, in my old days of brewing now I just use powdered yeast, but, you know, yeah. I’m the same way. I I’m assuming that, uh, gave, is doing this, you know, after the kids are in bed and he opens up, uh, a beer and, and, uh, harvest the stuff of it late at night, because.
Tom is at a premium here. So for me, I’m a lazy hinder, or I don’t, I don’t bother with propagating my own yeast because that’s one of the things that I cut out in my one place where I decided I didn’t want to invest the time. So I’m, I’m with you. I’ve got, I buy cheap, dry yeast mostly, but, um, you know, if like, if, if yeast is hard to come by or whatever you got the time late at night and you can propagate some yeast, then go for it.
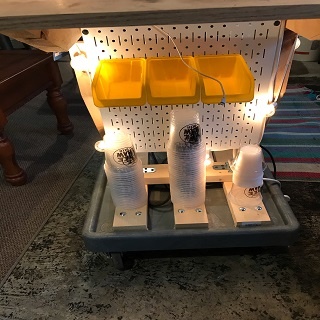
Me. I’m a lousy biochemist. So I don’t know. It’s so funny. So now we’re going to jump into number six. This is the last one. And I couldn’t agree with this one more. If you’re going to make an ice spindle, which is the DIY floating hydrometer. Program the ESP 82 66 before soldering it into the board. That way, you know, ahead of time, if it’s a bad microcontroller.
So one thing I’m going to kind of stop here and point out is that the ESP 86, 82 66 is a microcontroller that is very inexpensive. You can buy them for about $2 from, from China for about $5. You might be able to buy like five or six of them. The problem is, is that they’re so cheap that the qualities on a lot of them, especially if you get the cheaper Chinese knockoff ones.
And so there is a, if you have a batch of five, there’s probably a couple that aren’t good. That’s just kind of the deal. And so one of the things that he says is dishonoring them. Is a real pain in the neck. And I personally didn’t want to start over whenever it happened to me, even though I had all the extra parts.
So because soldering, everything else on the board took so long next time I’d probably solder the pins onto everything, test it in a breadboard and then solder it to the sewer circuit board. So I will point out here. You should always do a breadboard with any of these Homebrew projects, like the brew pie.
I spindle breadboarding it out. And programming the micro-controller is always a good process to do, just to make sure that all your components work, get all of the bugs out before you go soldering it into a PCB. Uh, I couldn’t agree with that more when it comes to that. I know you’re not a big soldering guy, but, uh, no, I was going to say to your listeners who have no idea, half of the words that you just used by the tilt hydrometer yeah.
And that also solves a lot of the problems too. Cause it just works out of the box. If you want to have the benefit of a floating hydrometer, which I find very useful, but you don’t run through the process or you’re not an engineer. Uh, and you’re not good with circuitry by the tail. Hydrometer works.
Great. So you spend more money, but it’ll save you a lot of trouble. See, it’s it’s that, that is also an option, but this is also homebrewing. DIY DIY projects are in our books. So God forgive me.
Totally. Okay. Totally. Okay, Okay, Okay. So Gabe, thank you so much for this detailed, long email, but I think you hit on a lot of really good stuff here when it comes to different types of tips, tricks, and hacks. Uh, I thank you. What is making your own CO2 out of sugar water? That’s gotta be the winner here from Ghana.
Now that’s a Homebrew hack. If I’ve ever heard of one, it is definitely going out. Go, go in the step above when it comes to adding more, more. CO2 would be the system. All right, you got another one to read? I got another one by email from Mike Weatherill. Mike writes office closet brewing here. Love last year’s hacks episode.
Thanks for dimensions. Well, Mike you’re back. Thanks for, thanks for writing us back. Here’s another hack instead of making your starter in a flask, just make it in your fermentation vessel, whip it up the night before and your sanitized bucket conical or whatever. Save time on brew day, less chance of infection.
There, you know, and there’s no, there’s no transfer. All right. So that’s, um, you starter in the fermentation vessel. Gotta be, I gotta be honest. There, there, I, I like this idea of it is a really, really good idea. The only thing that I would throw out there, because people are going to come and be like, Oh, I wouldn’t do that.
And here’s what they would say. Yeah. I’ll play devil’s advocate to that one. Right. I think that. All of the positives he says there, right? Hey, it’s all in the same vessel. It’s less chances of, of having it contaminated because you’re not having to transfer from one vessel to another. But I will also say that one of the things that you want to do when making a starter is I, I want to decant off all that kind of fermented work that’s already in there without hops and it’s extract and just try to get to the yeast.
And so I don’t like to throw like a beer that hasn’t. Really been through an oxygen free process for me, and then just throw it right into a batch of beer that I’m trying to start at the beginning. But that’s me personally that I don’t make a lot of starters anymore. I mainly just use dry yeast. And if I don’t use druggies, uh, I just use the shake method to make a, a starter if I need to, but it’s not something I do very often, but that being said that would, I would say that would be the devil’s advocate to that.
Is that. Most people, or at least I used to decant the fermented work from my starter so that I just kind of poured in yeast instead of like kind of halfway fermented war with it. Well, there you go. So you got two opinions there. That’s my opinion, but I don’t think it’s a bad idea either. So, you know, whatever works for you works for you.
Mike has another, another one here and this one she’d done myself. So he says hops in a hot bag, suspended in your keg by plane dental floss. After the amount of days you want to dry hop, just pull the floss to lift the hops out. You don’t get the grassiness and keeping them in too long. So I’ve actually done exactly that before Mike.
Um, same as you and, um, I even recently bought a new. I needed to replace a lid on one of my kegs. And I saw, um, like Amazon or something. You can get one that has a little welded, um, like a hook thing on the inside of it. So you can do exactly that. You can hang up dry, hot bag. Uh, off of the inside of the lid.
So it’s just right there for you. I wouldn’t recommend using any sort of minty dental floss. Um, I guess if you’re making something special, you could try the cinnamon kind, but a plain, plain dental floss. Yeah. I would recommend sticking to that. Um, You can also kind of tie it. If you don’t have a lid that has the little hook on the bottom, what I’ve done is I’ve tied it around the lid, like underneath, between the, between the lid and the O-ring, but not between the O-ring and the body of the keg.
And you can kind of loop it around there so that it’s, it will still hang, um, and allow your kegs to seal. Um, but yeah, that’s definitely something that I have done myself and would recommend it. I would agree with you on all of those points. And I think it’s cool that there’s a keg lid that is meant to suspend hops in.
I think I I’ve never seen that. And I think that that’s a great idea. Yeah, great. It’s almost like it’s almost like people have, have to solve the problems. Homebrewers have.
Well, I’m gonna take, uh, let’s, let’s take a quick commercial break and we’ll come, come right back. And then we’re going to jump into some of the Homer hacks we got off of our social media and we’ll do a deeper dive on those when we return.
Now we’re back and we’re going to jump right back into our Homebrew hacks. I want to thank everybody who sent us emails for the Homebrew hack show was really great reading them and they some really, really great hacks in there. Uh, all I got to say is thank you. I do want to jump into some of the ones that we’ve now gotten off of our social media.
I’m going to start with one that I have from Brian Paul. And this is one that we got off of Facebook. And Brian, Brian says set your kettle on a wall timer. So your mash temp is there when you’re awake. When you wake up drill a heap of holes in a 20 liter pale. See your grain bag in the top, like a, of a, of a trivet for draining and then squeeze and sparging.
So that’s basically a big colander. Yeah, like a big Hollander, but using like a 20 liter pale, instead of trying to do it through a little colander, I mean, essentially, that’s what I do. I take my bag out and I move it straight to, I have a large colander that fits in a seven gallon bucket. And covers the entire top.
And then I just set my bag in there and squeeze it through the colander and it works great if I want to sparge through it, I could, I don’t sparge, but I just squeeze the crap out of my bag. I will also say the wall timer for the mash temp is a great idea. If you have a, an electric probe in it to heat up, I, there there’s, there’s great ways like you could get, if you have like, A home automation system, like smart things or something like that.
You could just get like the $30 plug that does that. Yeah. Hey, you know what? I haven’t seen any like, um, DIY hacks using smart plugs yet for homebrewing stuff. I’d like to see somebody come up with. Cause there’s like, for example, in Europe, what they do a lot of is they actually do a lot of mashing in plastic buckets using heating ones that are electric.
Right. And so you’ll take like a five gallon bucket and there’s like a heating wand that you can set in the bucket and it doesn’t touch the bottom, but it’ll, and, and the plastic will, you know, if it’s food grade, plastic is actually good to about 220 degrees. And so it’s totally fine to brew in. You still would brew in a kettle, but you would mash in the, in this, with this wand.
And so I I’ve seen a lot of, of different setups like that. Where they have, like this five gallon bucket, it has a, a one that just plugs into the wall and it has like a dial on it and you can kind of set the temperature that way. Uh, so it’s, it’s definitely a way of, of getting your strike water up to temperature and you can set it on things like a wall timer or your like smart plug and say, Hey, at 4:00 AM, start the, start the wand and get my.
My strike temperature up, then you would mash in things like maybe a cooler, right? You could do that with a cooler and then mashing your cooler, then move it to your kettle and hit it with propane. That could be one way of dealing with. Yeah, totally. That’s a good idea. That’s a, that’s like a good, low tech solution to like, instead of the full on electric brewery system.
Exactly, exactly. Uh, what, what’s our next, what’s our next hack. Okay, so I’m gonna, I’m going to read one from Steven socia here. He says buying a brew cart helped me start brewing earlier and spend less time running around for looking for individual tools and ingredients. It makes clean up easier, uh, et cetera, et cetera.
Uh, you toss stuff into the bin. So the brew cart. Now he has a picture of it here and it looks like a. Uh, it’s like one of those industrial wire shelving kitchen carts, things that you can buy at. Um, I’m not sure. I think you can get them at home Depot or Ikea or something. I’m not entirely sure, but, um, the brew cart base is like, it’s your, your place where you have all your stuff, you know, it’s like, um, Fred’s brew team minus the, uh, Thing to hang your bag off of, but, um, I’m going to one-up Steven here a little bit because, um, I use the blue card as well, but mine is actually a stripped-down, uh, re repurposed Weber grill frame that I took all the grill parts off of, but kept like the metal frame on the wheels.
And just like laid down some lumber on top. And I still have, I have like my shelves in my surface and everything. Um, but yeah, I like the brew cart. I think it’s a great, uh, way to, um, easily move all your stuff around and get set up, get cleaned up. Um, I’m not making 20 trips into the garage to put, you know, grab this and that.
And, um, It’s also like, as you sort of add componentry to your system, then, uh, it, it kind of keeps everything in one place. So I like the brute cart. This is a great, yeah. He put a great picture of it here and, uh, yeah, I used something very similar. So good on you, Steven. Yeah. I, I like it. I’m a big fan of brew carts in and not having to run around for all of your parts.
Right. There’s. A certain set of things you need in every day and having them all at hand and having a spot for them is just going to make things go smoother. And then you’re not having to boss and look for things and be like, Hey, I was looking for my water kit, where did it go? It has a spot. It has a place.
These are, I know that it seems like only common knowledge for a lot of people, but if you’re starting out. This is I think the best advice when it comes to how you organize your things is have a place for it for your brew day, that it’s at hand and close to your, your brew station in a way. Yeah. It helps establish certain routines.
You know, you keep everything in the same place and you kind of have it. It helps over time, like over, you know, half a dozen batches you’ll really dial in just like the process of, with, you know, what’s where, and like, When, you know, like when do you do what and et cetera, et cetera really makes it efficient from a, just from a workflow process.
And I actually, I, I noticed here in his picture, he actually has on his brew cart, which I think is awesome. An electric tea kettle. Which is brilliant. Cause like you need hot water all the time. So this is an outdoor setup and I use an outdoor setup and I have, yeah, I just have hose water. So like having that little kettle, it’s like, Oh, you own, you need like a liter of boiling, hot water there, you know, it’s right there on the cart.
I like that. I might, I might take that on my dad. That’s my card now. Yeah. Electric teakettle is a great idea. For more than just brewing beer things like, Hey, I’m making some Mead, right. And I need to dilute the honey by having an electric tea kettle to kind of dilute the honey and stir it up and do it with a little bit of water.
Before you add the bulk of your cooler water would be a great way of helping you dissolve all of that honey really quickly. Especially when you’re talking about pounds and pounds of honey, heat’s going to help that. Uh, if you’re, if you’re doing brew in a bag, having a little bit of boiling water is going to help you sparge it.
If you will need to splurge a little, you, you, you feel like, Hey, there’s still some sugars in there and you could use a teakettle over a colander to sparge very easily. Right? So these are all kind of cool things that I think a tea kettle in itself. Is a hack, to be honest. Totally. Yeah. Uh, so I’ve got next, uh, Matthew Iyer and he says I have a half inch thick laser cut piece of aluminum, the exact size of the flat bottom, try clad kettle for amazingly heat, even heat distribution.
It’s total overkill and likely completely unknown, but Hey, I’m an engineer and this is what I go to. And I’m going to say, uh, Matthew, this is the kind of thing I love about homebrewing, right? Is, yeah, it is kind of overkill. And, but the fact is, is that it’s things like the ingenuity that comes out of people.
Thinking of the, the things to build their process better at home. Right? I mean, yeah, it’s a, a try cloud kettle, but adding that piece of aluminum, aluminum is a great conductor of heat, but you don’t want to have an aluminum interior on your pot cause you get the light black miss. Right. Don’t get me wrong.
The aluminum pots are fine. If that’s what you’re using to brew beer, there’s nothing wrong with it. Your beer is going to taste fine. Aluminum has no issues. Matthew, I’m going to make fun of your over-engineering, but only because I’m jealous here. Uh, I want, I want you to come on the show and then we can maybe talk about some custom laser cut pieces for my brewery here.
Yeah. I, I, you know, Hey, if you can do it, do it. It’s really, really cool. So, uh, you got another one? Sure. Let’s see what we got here. I’ve got, um, Uh, yes, I’ve got one. Oh, I like this one. This one, this is a very simple one from Jim McCall that caught my attention. He says, hang your mash paddle on the walls. A decoration.
Get yourself a big 24 inch whisk bar. Better, no more dough balls. You can even dump all your grain in at once. So a 20 big ass whiskey, I guess, go to baking. Supply store now, restaurant supply has those whisks, and this is a hack that all the way back in 2013, when I was really getting into brew and a bag that that was something people would say is, Hey, get this, get a big whisk from restaurant supply.
They’re not super expensive. They’re like 10, $15 total. It is 24 inch whisk for forgive me here. Cause I’m not a Baker or a restaurant person. Is 24 inches, like the length of the handle, right? It’s I’m, it’s not like a 24 inch diameter of no, it’s the length of the whisk is 24 inches. Right. So think like it’s like a two foot long width and.
And the width is going to be, you know, whatever’s going to be relative to that in whisk you’re. Okay. I was, I didn’t think he was talking about like a literal ginormous whisk. Yeah. 24 inches wide. But the cool thing is, is that with that, and I totally agree. Especially when you’re with brew in a bag style brewing.
I like the whisk because. A, you’ve got a really fine crush generally with Bruin a bag. Most of you, if you’re doing Bruna bag, the crush is a lot finer. And so your ability to create dough balls is a lot more, and you want to get as obviously much contact with that water to green ratio as possible and not have it have clumps and things like that.
You want to really get it submerged with any style, whether you’re doing. Whether you’re sparging or not, you still want to get all of your grains wet. So, so actually I need to follow, I’ve got a shout out to Wayne Ferris here on Facebook, who said the same thing down lower in the thread. He says, I use an 18 inch wire whisk to stir the mash almost instantly breaks up any clumps.
So that’s plus two, four a. Why is it the same? It’s like, think about, think about it this way. You’re making pancakes. Right. I always bring brewing back to food. Just so you guys all know is that you’re making pancakes. It’s much better to take pancake batter and whisk it together. When you’re trying to get all the lumps out of it.
Versus if you have like a spatula or a large spoon, you’re just going to leave them behind. And that’s the same with, with. With doing dobles out of, if you, if you can whisk it together, it’s going to just break them up much quicker and cut through them. But me personally, I have a mash paddle that has a lot of holes in it and allows me to really get in there.
And I have no problems with no balls in it, but it’s because it allows enough of the, as it is, I’m stirring it through my mash. It’s breaking everything up and it’s actually. Got enough space for those Dole balls to get broken up by it. So a good mash paddle also work, and that’s why they have mashed paddles is like it, think of it as like a big wood whisk back in the days before people really had big stainless steel whisks.
Right. It’s that’s why it’s so classic. Um, mine is going to be from.
Sage harden, Anthony, the fourth, I use a bag and a mash tun, but I use a hot liquor tank and a pump to research relate through a Herms coil and the hot liquor tank. My Herms Herb’s coil and the hot liquor tank. My Herms coil is a stainless robo brew chiller. I also recently started using a barbecue thermometer with two probes to monitor mash in hot liquor tank.
Temperatures see more? So, uh, sorry, let me start that over. Bye bye, Bye bye, Bye bye. Off there, the thermometer and to, to monitor mash temp in the hot liquor tanks tab simultaneously with while, while sitting down. The thermometer can be set to alarm alarm at specific temperatures. So I don’t really have to pay close attention during the mash.
So basically he’s got a hot liquor tank in his home system and he’s actually circulating the bash between the two vessels. And he’s also got two trucks. Yeah. But your probes throughout the entire thing with alarms that let him know, Hey, this is falling out of range. I need to add heat or not. I think that’s a great idea.
And this is a brew in a bag method in this Herm system as well.
That’s cool brew brew in a bag with Hermes. I like it. Yep. I did something similar with the kettle rims brew in a bag where you can research collate through a kettle, um, same, same concept. Uh, I, yeah, I love it. Yeah, it’s just, it’s the ingenuity of it. All right. It’s like, uh, it’s kinda crazy how all these different systems people have are still it’s like, whether you’re a three vessel brewer, you’re a brew and a bag brewer.
It doesn’t matter. It’s like the ingenuity of a homebrewer still gets it done and, and our systems are kind of extensions of us. It’s it’s so cool. Um, okay. I’ve got, I’ve got a couple here. There they go together, but I’ve got to give a shout out to Earl ball here who posted like five hacks on, um, one of your Facebook posts here.
So we’ll go, we’ll look at a couple of them here. So he says a little call back. He says, place kegs on a scale and filling close transfers. They’re full at about 41 pounds. There you go. So. Get yourself a $20 postage scale, a hundred pound capacity, I guess. Right. Um, he always just something we did today. I mean, when you use the scale on a tech today, for exactly that reason, exactly conserve CO2 attach, blow off to the outline of a pre sanitized keg and the inline of the keg to your bubbler jar.
This purges, the keg with CO2 from active fermentation. Interesting. I don’t quite follow it, but I’m sure it makes sense if you actually set it up. So I’m assuming that any sort of blow off in and stuff would go into your bubble or jar. Yup. But you’d be, um, Oh no, you purge the keg. Okay! Yeah. And you purge the courtesy of two.
So basically you end up with a. Empty keg filled with CO2 from France, something we’ve talked about extensively on the show. If you go back and listen to one of my shows with Brian Hite, specifically the 3d printed brewing episode, he actually has a 3d printed lid for a jar that is. Made for exactly that is to blow off that goes into the jar comes out, but it’s actually a 3d printed lid for your jar that has barbs on it for it all to come in and come out.
So it’s super clean. And then, and then he just has an air lock that sits on the out of his keg to purge it. And it works great. Brilliant. Okay, cool. And then Earl says he also, he says you citric acid passivation three Oh four stainless steel, 4% citric acid by weight, 140 degrees, 60 minutes. So passive eating your stainless steel.
That’s like, um, restoring it’s ionic, something or other with the, I think he talked about it with, uh, Yeah. With the five star chemicals, when they were on the show, we talked about passive eating it. Cause you can also just use straight star sandwiches. Also acidic, just keep your stainless steel. Nice and fresh.
I believe. Yeah. It keeps it super clean and shiny also helps you not have a buildup of beer stone. Right. Which is actually a problem I am having right now with my. Electric brewing system is that I’m starting to get a buildup of some beer stone on it. And so what I’m going to do is run it through some acid wash to actually break that beer stone down, get it all scrubbed off, and then I’m going to pass, ovate it with star sand and get it to just shine.
So, yeah, passive, passive bait, your stainless steel guys. You don’t have to do it every time, but you gotta do it like once a year and it will save you from having to have really big builds up builds buildups of beer stone, and it’s totally worth that extra step once a year. Not a big deal and easy to do.
So then the last one from Earl that I’ll read is he says don’t use screw clamps on gas lines. Uh, I’m guilty of that. I use screw clamps on everything he says they don’t clamp uniformly use, and I’m probably gonna mispronounce it. Oetiker clamps. The crimpy ones. I believe there were the crappy ones. You had to have a special tool.
You have the tool for it, but they do, they do clamp more uniformly. They do. And I use screw down clamps for everything as well, just because I don’t have the tool and I need to get one. And I agree. I, when I, when I first did my Keizer, I, my. One of my good friends in Utah actually did beer lines for all the breweries and all the restaurants in town.
He, he, that was his, his job. And so he had the proper tool and came over and clamped down all of my, my, my connections and I’ve, and I never had an issue with leaks. I will tell you once I redid my lines about three or four years later, and I use screw downs. A year-round Aaron. I had leaks and it took me like a month to hammer em all out.
So, and I went through two 20 pound tanks cause I had leaks in my CO2. I I’ve got them all hammered out now and I know everything was fixed, but it’s, you know, I would agree that screw down clamps versus the Oetiker clamps or there’s a big difference there. I’m in a. Pull up another one that we have here,
sorry, sifting through all of these posts. So
use this. So this is from a. Michael caste nigger. And he said, I used city hot water pressure to clean out my kegs and beer lines in one fell swoop with the hose, fitting on my laundry sink, uh, to the black disconnect, to my keg. So, what he’s doing is he’s taking the hottest water. He has trimmed from his hot water heater, and he’s basically using that water pressure to clean.
He has it going right into his disconnect on the keg. And then it goes right from the keg into his beer lines and then right out into a bucket. So he’s like clean the keg, clean the line all in once. So this is the old hook hook equipment directly into your house plumbing. Yeah, exactly. And then just run it all through your system all through.
Hey, that’s, that’s easy for me and set it up, but it’s easy. Yeah, totally. I’m not in a place where I could do that. My kegerators not close to any. Water like that. I will also say that I like to run, you know, obviously some sort of cleaner through it. I, between kegs, I always do a Oxyclean then star sand.
It’s almost like the same thing I use just to clean my brewery. I run through my beer lines. I also will say that I once a year try to do a cost to clean where I actually use caustic beer line cleaner, and man, you should see the stuff that comes out. It’s just gross. And, uh, so I, to me, it’s, uh, I, I just don’t feel like water is enough.
I want to run something through my beer lines, just so that they’re, they’re clean as they can be for every keg that I put on them. But that’s just me.
I use silicone lines and I find they, they last a bit longer, but they still get some of the staff over time. I use silicone lines as well. And one, one good thing about silicone tubing. And we’ll talk about this as a hack in itself, right? Silicone tubing versus vinyl, tubing night and day difference. First of all, silicone tubing, if you really need to clean out a pinch, you can just boil it.
Cause it actually. Totally safe to do so. And so I’m a big fan of using silicone tubing for that specific reason. Uh, you know, even for things like going from my kettle to my kegs or my fermentor, uh, going to for blow off tubes, I like silicone tubing for everything versus vinyl TV.
Good. You can get a cheap on Amazon to art reasonably cheap. Yeah. It’s cheap. Um, it’s more at the hub at the Homebrew store. Oh yeah. Yeah. I never best to hack don’t don’t buy a tubing at the home brew store. Buy your ingredients though by ingredients. Absolutely. And you know, they have specialty special, good spins specialty, um, you know, stainless steel fittings and stuff like that.
Things you need. I use the stainless steel ball lock style quick.
Disconnect fittings on my son. I find that it makes everything, there’s a bit of a commitment up front to like, you know, I had to buy it. You have to buy enough to like, To have every, everything on the same set of connectors. But, um, once I, you know, you sort of commit to it, it actually makes things really easy for swapping tubing in and around.
Um, I think it really simplifies the flow a lot. So I recommend that those as well, not really a hack, but a product that I think works really nicely for improving your efficiency, um, in, on brew day. So. All right. Let’s do one more each and then we’ll, uh, wrap the show-up. Okay, so I’ve got, well, I got a quick one here.
I’ve got, we’ve got two different folks here who recommend if you’re using a, uh, Bo a bucket style fermentor. Uh, with a spigot on the bottom to put a piece of wood underneath the front of it when it’s in primary, so that your, uh, yeasts sort of flocculate down away from the spigot. And then it’s almost like using a conical at that point.
You sort of. Made the low point below the spigot. And now you can, when you rack out of the bucket, you’re not getting as much of the gunk from the bottom there you’re wracking cleaner beer. So you have two different followers who recommend doing that little trick. Uh, it’s especially great. If you do like a big, healthy, dry hop and you’re not using a bag or something like that, it’ll kind of help everything get away from your spigot.
Well, we could use that as an example for today. Well, you and I we’re transferring my latest hazy IPA. And when I dumped that keg out, it was like nuclear in color. I had nine ounce dry hop in four ounce, four gallon, four and a half gallons of beer. And it was. Just, I, it was probably like a half a gallon too.
It was like, it was like there, there was some Catholic in there. Yeah. There was so much, it was probably a good half a gallon. I really only ended up with probably four gallons or 3.7, five gallons left in my transferred to my actual keg because it was. Thick and full. Right. And I could see where you using the bow, where you have a wider bottom, leaning it back, like that could help out of a CAG.
Obviously we used a floating dip tube, so it just goes until it hits the thick stuff and then it just kind of stops, but, uh, I can see where that would work. Uh, I’ve definitely seen that hack before and, and, you know, curious. They never did it, but curious if it does work. Yeah. I it’s the cheaper version of the conical that’s for sure.
Definitely, uh, you have a conical, right? You’re you’re your pockets are well not it. Yeah. It’s it’s it has a conical base. It’s not a true conical, but I, yeah, I use the SS brute tech brew buckets, which is like the, the stainless steel buckets. And it’s, it’s, it’s an upgraded bucket, but you know, it’s got, it’s got a conical base below a little racking valve, but, um, it’s not like a true.
Conical style fermentor. It doesn’t have like the bottom drain and the pressure lid and everything like that. But, uh, they worked really nicely for what I need them to do so happy with that. That was a good upgrade. And I’ve got a West Cofer here who says my wife calls it the redneck winged guard. And he sent me a picture here of he’s got a propane burner and he’s got a really sweet kettle, like a really, really nice one here.
That is a, it’s a brew gear with a big old Blakeman, uh, temp probe on front with a ball valve. And he’s got, you know, a burner that’s probably a 200,000 BTU burner with just all the jets under it. Right. And all around it. He’s got a cardboard and tape. Got it. Just kind of keep the wind off of it. Oh yeah.
Hey, but you know what? I will agree a windy day, a windy day, and a propane burner is just a walkthrough day. And so, uh, you know, anything to keep the wind off of it, uh, and not have to be like in your garage, so totally agree. I like your poor man’s Winguard good time. Want to share one more? Because it’s something that I’m really proud of, but this is a shameless plug for one of my hacks.
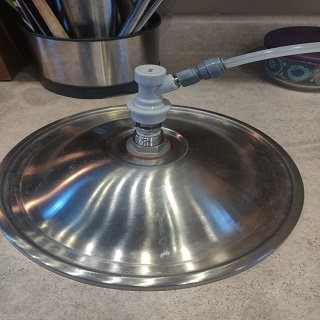
Um, and I have to admit this isn’t exactly a Homebrew hack, but it was a, uh, a hack that I think some of your listeners are as well, you know, maybe like, and maybe use themselves using home brewing equipment. So. What I did is I drink a lot of coffee. I drink a pot of coffee every morning. And the thing that drove me crazy every morning was having to pull the coffee maker out from underneath the counter so that I could then fill it up with a pitcher from the sink.
I thought there are different ways to figure out how to fill the reservoir on the coffee maker, from the house plumbing. And I finally figured out how to do it using the, um, duo typeset, you know, the, uh, do tight fittings and the lines you can. I think they have more beer and a couple of other places, but.
What I, what I did was I, I was able to T off of my ice-maker water line for my refrigerator and run it in a, um, next, into the cabinet next door and drop it down into the top of my coffee maker. And there’s a little inline pressure regulators. I don’t blast my coffee maker with full house pressure. And then there’s a little ball valve on there.
So. I, uh, save a little, save myself a little bit of effort in the morning before I’ve had my first cup of coffee by just opening up a little ball valve and filling up the reservoir on my coffee maker. It’s been a game changer. So that’s my little hack that, uh, I hope somebody, uh, get some enjoyment out of.
Uh, it’s a great hack and I will throw out there that Erin is quite the avid coffee lover. He’s roasting his own beans. He’s he’s. Yeah. And he even gives me beans and they’re delicious. So I’m going to say, uh, he needs that coffee every morning. Thank you. Uh, yeah, so I, first of all, I want to thank everyone who submitted their Homebrew hacks today.
Uh, I, I know that every year we go through, I I’ve now been a homebrewing for. You know, a really long time in my life and it’s kind of crazy. And I feel like we go through this, this is my second year of doing the Homebrew hack show. And I learned something new every year. There’s always something out there and you can never quite get there.
And it’s just astonishing to me, the ingenuity and the. Processes that when you look at brewing, it’s still the same. You still have to make wort. You still have to add yeast, but the way that homebrewers go about it is so different. And so variable it’s, it’s so fun. And so I, I just want to thank everyone for submitting all of your different hacks and tips and tricks because it just, I feel like I learned something new every year.
What would you say. I mean, I’m, I’m, I’m right there with you. Simple things. Like the fact that a scale at a hundred pound capacity can be bought for $20 or, um, that you can make your own CO2 to, uh, push a keg or purge a keg or whatever, you know, simple things like that. You know, these are great little tips for you.
I was sort of joking back in like March. When we all first went into lockdown. I like when everyone was like making a run on toilet paper, I ran to the brew shop and bought like a sack of grain and a bunch of yeast, because my joke was that I needed something to barter with. Um, I couldn’t get it once I couldn’t get anymore toilet paper, you know,
I liked the, um, I like, uh, you know how even we’ve got some tips on like, Hey, if you can’t find CO2, like here’s what you can do. Or like, if you can’t find a. You know, if we can’t get fresh yeast, like here’s, here’s some tips for cultivating your own yeast here. So yeah, it’s really a great to see how people are coping with uncertain times by, uh, figuring out how to make their own beer more efficiently.
I, I couldn’t agree more. Well, Erin, thank you so much for coming and reading some of these cool hacks with me and let’s just, you know, I’m drinking a beer or are you still drinking a beer? Um, I, I switched to seltzer a little bit ago, but I still, that’s fine. I’m going to do a virtual toast with you in these COVID times.
And I’m going to say Aaron, here’s the 20, 21 being an amazing year as well. Amen. Amen. Well, we’ll thank you very much, Aaron, for being on the show once again and, uh, hopefully we’ll. Talk to you next year. It’s always a pleasure. Thank you.
I’d like to think Aaron for taking the time, once again, to come on the show and talk through all of the different hoper hacks and also like to fake. All of the homebrewers who took the time to send us all of their hacks, tips and tricks and all of the homebrewers who sent us emails. It was great reading.
All of them. Follow us on Facebook, Twitter, and Instagram. Look for us at home homebrewing, DIY that’s it for this week. We’ll talk to you next week on Homebrew DOA.