
Today’s show is a bit of a different format. I will not have a guest on this episode today we are going to deep dive into a specific homebrewing subject. That subject is going to be fermentation chambers and temp control. We will also go out to some to the brewing community and see how then do temp control. Sit back and relax and lets deep dive together.
Try Brewfather for free: https://brewfather.app/?via=homebrewingdiy
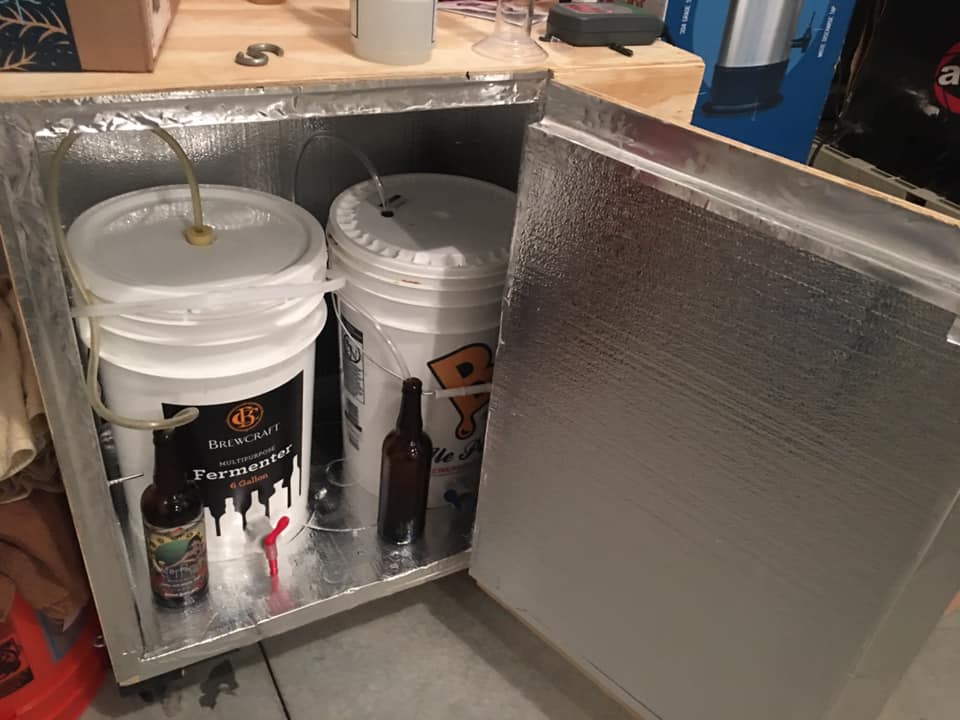
Reference Photos from Mark Williams:

The website is now live! Check out more detailed show notes and images at https://homebrewingdiy.beer
Support this podcast: http://patreon.com/homebrewingdiy
Huge thanks to Podcorn for sponsoring this episode. Explore sponsorship opportunities and start monetizing your podcast by signing up here: https://podcorn.com/podcasters/
Get your Scrubber Duckys: http://scrubberduckys.com
Try BrewFather for free: https://brewfather.app/?via=homebrewingdiy
Shop at Adventures in Homebrewing: https://www.homebrewing.org/?AffId=682
Social
Follow the show on Twitter, Facebook, and Instagram: @homebrewingdiy
Email feedback to podcast@homebrewingdiy.beer
Music:
Intro Music: SUNBIRDS by BOCrew (c) copyright 2012 Licensed under a Creative Commons Attribution (3.0) license. http://dig.ccmixter.org/files/BOCrew/38854 Ft: THEDEEPR / THECORNER / feat : FORENSIC
Not enough Horsefeathers by Fireproof_Babies (c) copyright 2008 Licensed under a Creative Commons Attribution (3.0) license. http://dig.ccmixter.org/files/Fireproof_Babies/13115 Ft: duckett, kulimu
Paper Planes – Durden ft. Airtone by DURDEN (c) copyright 2016 Licensed under a Creative Commons Attribution (3.0) license. http://dig.ccmixter.org/files/DURDEN/55041 Ft: Airtone
Brewfather ad Music:
Kalte Ohren by Alex (c) copyright 2019 Licensed under a Creative Commons Attribution (3.0) license. http://dig.ccmixter.org/files/AlexBeroza/59612 Ft: starfrosch & Jerry Spoon
Scrubber Duckys Ad Music:
Music:
Jeff II – Liquid Demons
Link to the song: https://youtu.be/UkRIKiBJ5Oc
Show Transcript (A.I. driven there will be errors)
Colter Wilson: Personally, I think one of the most important facets of making great beer is the ability to control the temperature of your fermentation. Considering that yeast is probably one of the number one contributing factors to flavor. Having it at the correct temperature through the fermentation process is something that you can do to stave off off-flavors.
So today we’re talking all things temp control on homebrewing.
Welcome back to harboring DIY, the podcast that takes on the do it yourself aspect to home homebrewing gadgets, contraptions and parts. This podcast covers it all. On today’s show, we’re going to talk about all things fermentation, temperature. We’re going to talk about. Fermentation chambers. We’ll talk about temperature controllers and how you get through that fermentation and control the temperature, and then we’re going to go out to the community and find out how they control their temperature and see if we can learn any new tips and tricks.
But first, I’d like to thank all of our patrons over at Patreon. It’s your ongoing support that keeps this show coming to you week after week. Head over to patrion.com forward slash homebrewing DIY and give it any level. We still have a couple of scrubber duckies to give away, so if you head over and give at the $5 level, you can get a free gift from our sponsor scrubber.
Duckies so. I’ve, I’ve got one or two left, so it would probably now would be the time. We also still have a special going on for the first $21 patrons getting access to our ad-free RSS feed and a logo sticker head over right now to patrion.com forward slash homebrewing DIY. Another way to support the podcast is by writing us a review.
We’ve got quite a few reviews lately and really excited to see and read them all. I can tell you that that really helps us show up on the Apple charts so. Go over to your Apple store or to pod chaser.com and review us today. It really helps us out a ton. The last way to support the show is to head to homebrewing diy.beer our website and click on some of our sponsor batters.
Click on brew father adventures in homebrewing. Your support helps them know that we sent you, and then they support us in turn, so no changes in your price. Just supporting the show that way. I’ve also got some new brewing projects going on. I’m gonna keg my new England IPA. I think that that’s going to happen tomorrow and I can’t wait to taste it.
I think it’s going to turn out really well. Things look really good. This brew surprisingly has gone very smoothly. I did have a bit of another brewing distant disaster. I feel like every time I. Talk about my homebrewing lately. It’s been a bit of a disaster. Well, I got a text message from Aaron Bandler across the street.
He had made a mistake when he had made a 10 gallon batch, so we shot me a text and it’s kind of funny. He had taken some parts out of, I guess I’ll start over here. He was fermenting in a keg and he was using the gas blow off as the, the gas out of the keg as the blow off, and he had it attached. Too. He added, attached to that, running into a blow off into a growler, uh, next to the CAG.
Well, when he texted me, he had figured out that there were some parts missing in the push down on the ball walk and that it actually wasn’t releasing pressure. And so I go over there and I pulled the keg out into his backyard. He lets me into his house and I continue to then pull the pull tab on top of the keg and spray beer everywhere.
I think he lost about a gallon or two of beer just into his backyard, trying to get rid of some of the pressure. And then I went and took a old picnic tab. Cut it off, put a gas valve on it, and then popped it back on. And a wet my Merry way. Thought I fixed the problem. Well, what I didn’t know is that in thinking I fixed the problem, actually created a siphon, and as his beer fermented, it then just overflowed into, and luckily, luckily he had it all sitting in a bin so that if it did overflow, it didn’t make a mess into his basement.
But I filled the entire. Ben up with his keg. So he’s out an entire keg of beer and it’s kinda my fault. So sorry, Aaron. We both really screwed up fermenting in a keg this time. Not, not a, not a good week. Well. I, I’ve got a break here for a really quick ad from our newest sponsor popcorn, and then we’ll jump right into today’s show where we talk about fermentation chambers and all things fermentation, temperature
Well, welcome back. We’re going to have a bit of a different format change today. Normally on this podcast, I have the guest, and for the first time, and this is completely on purpose, I actually chose to not have a guest. I wanted to do a bit of a deep dive into a single subject. So at first what we’re going to do is have a.
Deep dive by me about that particular subject, which this week is going to be fermentation chambers. And then after that we’re going to go out to the community and talk to them a bit about what they have done. And I think that will be today show. So let’s first talk about fermentation chambers and why fermentation temperature control is so important.
I think the first reason why temperature control is so important is that, let’s just dive in a bit about yeast. Yeast. Depending on the type of use that you use has a certain temperature range. So for example, if you use a standard, I would say my number one go to yeast is the SAF El USO five and when you use a yeast like Seth LUS Oh five actually has a pretty big temperature range.
I believe that when you read the back of the package, it range anywhere from the upper fifties. All the way to about 75 degrees is what the standard range for that yeast is. And the idea is that if you have it anywhere in that range, it’s going to give you a fairly clean fermentation profile. Now that being said, different temperatures are still going to give you different flavors.
So for example, when I use SAF, El USO five my, my main shot. Is trying to get in the middle there, right? I, I usually Fermit anywhere between 65 and 67 degrees. And what I try to do is actually have the beer temperature be those temperatures, not my chamber temperature, be those temperatures. Right? So one of the things that I use as a trick for that is having a Thermo, well that.
Drops right down into the center of my beer. I have a stainless steel tube. I put a temperature probe down that stainless steel tube, and then that tube actually sits all the way down in the middle of my beer, and that gives me a very accurate temperature. One thing that you’ll find with temperature control is that if you were only looking at the cha chamber temperature, so you have a standard temperature controller, then one of the things that you’ll find is that you’re going to have.
Only the temperature of the chamber itself and not the actual temperature of the beer and what’s fermentation happens. That could be a very big difference. Let’s say the room you’re in is 65 degrees, but with the heat created from actual fermentation, that could be all the way up into the mid seventies sitting in that temperature.
So I think it’s really important that whenever you do have temperature control, whatever you’re using to control it is either a Thermo well. Down into your actual beer, or is it least taped to the side of your fermentor? As long as it’s. Plastic or thin enough to actually transfer some heat there so that you’re actually getting as close to the beer temperature and not just your chamber temperature.
So kind of a trick there, but back to yeast, that’s where we were talking. So different yeasts have different temperature rages, and when you get into more liquid yeast or lager yeast or, or really just. More specialty types of yeast, that range becomes a lot smaller. So for example, if you were to get a lager yeast, it might have a range of only 55 to 60 as the is the temperature range or 50 to 60 and anything over 60 is going to give it an off flavor.
That’s really the idea of why you want to have good temperature control is it’s all dependent upon yeast and the flavor that you’re trying to go for. The other thing that I think is really important with temperature control and why you want to have it is that when it comes to homebrewing. The main approach to homebrewing is looking to recreate the different styles of beer and trying to recreate different classic styles or styles or true to style beers in the hope.
And so when trying to do so you want to recreate is much of the correct environment to get that style. Now. Don’t get me wrong. Homebrew rings in art, you can do whatever you want. If you like to have a ale temperature beer that is always fermented at 75 or just done at room temperature in your basement, there’s no wrong way to make beer.
If you make good beer that way, great. I’m going to come over, I’m going to drink it, and it’ll probably taste great, but for me, what I’m trying to go for competitions or what I’m trying to make beer for the club. I want it to be as true to style as possible, and temperature control really plays a big part of that.
So let’s do a bit of a deep dive in to my temperature control of the past and how I kinda got there. When I first started home brewing, I was like everybody else. I brewed in my garage, moved it down to my basement. I actually had a pretty cold basement, probably in the mid to upper sixties and I would move whatever Bureau is making down.
I had an empty bathroom down there and I would move my beard out into the bathtub, which actually was. Great. It gave me a great place when I would have blow off and who wouldn’t go everywhere. So that was definitely a great way to start out. But as I progressed, I wanted to actually create more temperature control.
So my first tip, your controller was I is my current fermentation chamber. I’ve talked about it a few times on the show, but I’ll dive into it again for those that this might be the first time listening. My fermentation chamber is actually. Kind of hard to do. I and I gotta be honest. I really wouldn’t recommend doing it.
Fermentation chamber like this, though, I see many of them on forums. I see a pictures of them everywhere. There’s a couple of guys in the club that have similar setups to me, but to be honest, this is not the way. If I were to redo it today, I would do it. But it is the chamber I have. So my, my fermentation chamber, I currently have.
Is an old dorm fridge, and what I did is I ripped the door off of it. It doesn’t have an actual door on the front of it. What I did is actually created an extension box to that fridge. That is made out of OSB wood, and then I insulated the hell out of it with a bunch of styrofoam insulation that I bought at home Depot.
A sealed it up as well as I could with silicone and all kinds of sealants to try to just keep as much of the heat in or the coolness in and to have it just be thermally stable. And really, that’s my setup. It’s, it’s actually cooled by a dorm fridge, and he did buy a. Paint bucket with a light bulb in it.
I just used a hundred watt light bulb and a paint can, and that’s really my setup. I can actually fit two, seven and a half gallon fermenters in there so I can do a 10 gallon batch and have them both in the fermentation chamber and know that the temperature is very solid. My first temperature controller was actually.
This is back in 2014 it was called an STC 1000 they still make them, you can buy them for about $15 on Amazon. It’s kind of like a DIY temperature controller. The, the more modern version is actually the ink bird ITC 1000 and the ink bird is the full. Prebuilt out version where it’s got a temperature controller.
It’s got an area with two plugs, one for heat, one for cool, and it has a single temp probe that you can put inside your chamber, and that’s how you’re going to be able to do it there. They’re really cheap. You can get one for . It’s 30 bucks on Amazon. Highly recommend getting one, and I will have a link to it in the, in the show notes.
So if you’re looking for, I call it the first level of temperature control. I think that the ITC 1000 is probably the best for the money controller you could get today. When it comes to just kind of, I want an out of the box solution. Well, I had that for about six months, brewed a bunch of beer with it, and it worked out great.
It’s a super solid controller, and then from there I decided. Hey, I wanted to get a little bit more advanced. So in 2014 I built my first brew pie set up and it was a pretty cool project. This was the first project I ever used an Arduino on. I use an Arduino UNO on it, and I created my first ever brew pie set up.
And this is using the classic old model. You had to flash the prom and it was a kind of a pain in the butt to set up . But I found some instructions that you could do without having to solder. You could actually use some wire nuts and have a brew pie up and running off of the Ardwino. I did actually do soldering on it and did a really cool job of creating my own kind of circuit board out of wires.
It was really cool setup, but what this temperature controller allowed me to personally do. Was to set up my first ever PID set up for temperature control in a fermentation setting. And what a PID does is it allows you to get within a. 10th of a degree of temperature, and I’ll recommend, if you really want to go into a deep dive of a PID, you should listen to episode eight of this podcast.
That’s the podcast where we talk about ferment track and we get into a pretty deep dive on a PID, but the idea is that it’s a control algorithm that allows you to be able to stay within a 10th of a degree period. You use the beer. Temperature, and that temperature doesn’t swing your fridge and your heat may swing multiple multitudes of degrees in either direction, but that beer temperature stays stable.
And one of the cool parts that I’ve found with my PID controller is it even factors in the heat created by fermentation itself. It’s, it’s kind of an amazing setup, and I highly recommend that if, if you can roll up your sleeves a bit and create a. Either a brew pie or a brew pie less or brew pie remix or ferment track set up.
They all kind of run off of the same controllers or have very similar setups. These are all great methods to be able to have really solid temperature control and for not very much money. I think you could probably get into one of those. Start to finish for less than 50 bucks. So definitely something I would recommend.
Now, let’s talk a bit about what I would do if I were redoing my temperature control today. I’ve been brewing now for about a decade, and I. No, a lot more about brewing. It’s just experience and over time you just kind of learn. If I were to redo it all, I’d still use my same temperature controller. I think that having a PID is very important to me.
I think that it’s just kind of the way I brew. I love the charts. I love all the stuff I get from it. It’s highly detailed and I just recommend it in general. But. If I had to redo it today, I would just get a chest freezer. I think that a chest freezer is cheap and easy to find online. You could go to Craigslist and find an old chest freezer today, and you can also keep the same temperature controller.
Like I’ve built with the chest freezer. It’s the only one drawback is finding room for it, but it still allows, it would allow me to do 10 gallon batches and have a couple fermenters in there going at the same time, and that’s just kind of what I would do today. I wouldn’t actually go and create this huge like Franken box like I have for fermentor today and that that would be the big change.
Other than that, I would still do the same temperature control. I think the next part I want to talk about are some of the off Lavers that you can get in your beer by lacking in temperature control. I think the number one off flavor you’re going to get is that fusel alcohol flavor. It’s kind of that hot flavor alcoholic kind of, I guess that that’s the best way to put it.
When you get beers that have this like very alcoholy flavor. I think that that is a big factor when you have beers that are way too hot with temperature. If you have too high a temperature, it starts to get this like fusilli alcoholy flavor, and that’s one that I notice a lot with beers that are not temp controlled.
You’re usually going to see that off flavor with beers that. Or over 80 degrees with temperature unless a reason to for some reason that one is able to stay clean, even those high of temperature. I would say the other big one that I see is Diasporal that kind of buttery or butterscotch flavor. I see that a lot when we go to Homebrew club and if you have beers that have had temperature issues, I see a lot of Diasporal is an off flavor from that, and I have to admit.
From drinking my own Homebrew for years and maybe a couple of friends home brews. I never really experienced Asil, but now that I’ve been tasting a lot more Homebrew from larger groups of, of friends that Homebrew, I run into a diacetyl beer every now and again. I can even think of one I had at . The last Homebrew meeting that actually tasted a lot like diastal and it was weird.
You could call it out. The smell was butterscotch. The taste was butterscotch. It had a kind of slick mouthfeel. Uh, definitely something you see with beers that have temperature control issues. Another off flavor, depending on the style, could be an Ester kind of flavor or a fruity kind of flavor. I usually call it, you get some banana out of it when you have too warm of temperature.
When your temperature is too warm, specifically around the over 70 range, that’s when you start to get that, that flavor of banana, and there’s a lot of beer styles that are like. Do not taste banana. I actually have a joke where it’s kind of a joke. When you read the BJC P style guidelines, there’s always.
Does not taste like banana. It’s throughout the entire guidelines. It’s kind of hilarious. I will say there are certain styles that like banana, for example, to have banana and clove in it is totally fine. Clove is, if you get it in the 60s you go over 70 it starts to throw off bananas. But if you can get that balance right and it could have advisen totally fine, but that’s the point of temperature control.
When you have different beer styles and you’re shooting for a certain plate flavor profile, it’s super important. That you have the control to try to get and nail that profile. And that’s the importance of temperature control for me. Well, I, I, I think I’ve been going on and on and on about a temperature control by self, and I think that now let’s just hop out to some people on some social media and have some.
Feedback about what they do and see what it sounds like. So, so let’s just jump right into it and start reading some of the feedback that we got. I put a call out to Facebook, Instagram, and got some really great responses. And what I asked everyone was. Hey, what are you doing to control your temperatures for your fermentations, and what are your setups look like?
And so here’s an example of one. I got this one from saieg Hart and Anthony, the fourth, and I’m going to read this out to you. I had an AC unit in my fermentation chamber all last year. Then I got a mini fridge around Christmas and rebuilt it with the mini-fridge. I have since gotten a heater to keep it warm when it’s cold and I have a fan to re circulate air if I need it.
Also, I built mine from scratch and he actually has a photo here and he has this, it’s actually quite a beautiful wood box with a lid, almost like a chest freezer. It’s got a handle on the front, but it is built himself and he’s got a mini fridge inside of it. He’s made it with plywood and it’s insulated with styrofoam.
Pretty cool stuff, but very similar to mine where he’s using a mini fridge and then he’s also using a some sort of heater, I believe. Probably something similar to like a light bulb and a pink cat, but still a very, very cool fermentation chamber. The one thing that he did mention there that I didn’t dive into when talking about fermentation control earlier is having that fan to recirculate air really, really helps, especially when you have those types of PID controllers.
Having that air circulate really keeps things even throughout. So that’s definitely an add on. I would recommend to any fermentation chamber that you build. Here’s a comment from Steve Traxler chest freezer with temper controller in the summer and winter, I put a small quartz heater in the freezer and use a temp controller on it.
I can keep whatever temperature I want, and I asked him, what kind of temperature controller are you using? And he sent me a link. He’s got a Johnson controller, the a four 21 ABG dash zero two C just your classic. Old-school Johnson controller. When I first started homebrewing, these were the, this was kind of the first way to really get temperature control without having to build it yourself.
And they were pretty expensive back in the day they were, they were running, they would run you about 70 or $80, and they were really great, solid analog temperature controllers. So, yeah, you could do a really, really great job. Uh. I saw a lot of posts that are just a chest freezer with an ITC, three Oh eight temperature controller from ink bird, a lot of ITC, one thousands in ITC, three Oh eight so lots of those temperature controllers with chest freezers.
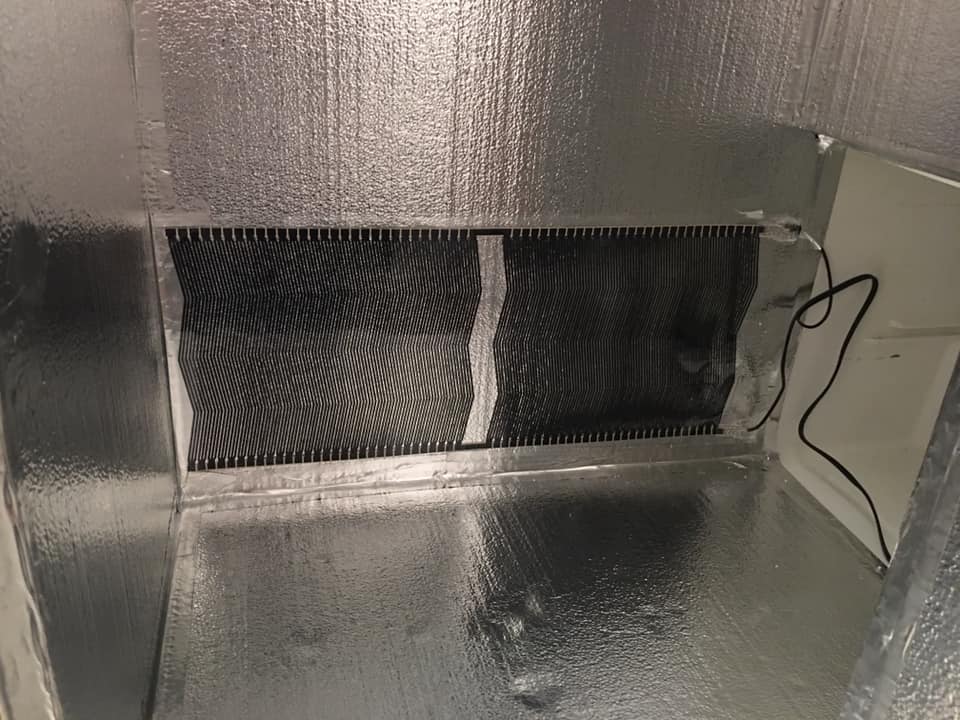
Here’s a post from Mark Williams, inc bird, dual controller, mini fridge, small heater and coil inside, and he actually sends some pictures and I will download these pictures and add them to the show notes. If you head over to homebrewing diy.beer and look in the show notes there, there’ll be these images, and this is a pretty cool setup, very similar to mine, but still using the ITC 1000 temperature controller.
He’s got a mini fridge. Attached to a wood box with a door very nicely insulated, but his heater is actually a pad heater. It’s a, and I would actually recommend that versus like I have a paint can with a light bulb in it. I would actually recommend the pad heaters. You’re gonna. Not worry about light bulbs burning out.
You’re not going to have to have issues. And he’s even got a great photo of two of his 6.5 gallon fermentation buckets in there. It’s all great stuff. And he did it for less than a hundred dollars and he said he can keep his . He could keep his control within a one degree. So if you’re not down to that 10th degree, like I am, a one degree swing isn’t going to be a big deal, and he’s using even a key, he actually puts his temperature down into a Thermo well, so really, really cool setup and I’ll definitely show some pictures there.
And I think the last part that I want to talk about is Ian Herbert, who’s actually one of the patrons to the show. We have a really cool discord server that if you’re a patron, we give you access to, and you can chat with me all you want and we chat with each other. It’s kind of turning it into a fun, small group of people that really like to show, and we talk about our homebrewing projects and what’s going on, but a Ian Herbert.
Is in the process right now of. Creating his fermentation controller for his fermentation chamber, and we’re having quite the conversation about it. And he was asking me, Hey, how do I wire my ESP 82 66 up for a Ferman track controller? So kind of the funny thing about the Ferman track controller is that.
It was originally built on the ESP 82 66 but because it used the same EEPROM as the Ardwino UNO and is really using the same scripting language, you could actually still use an UNO. And that’s actually what I’ve done. I, my, my Ardwino UNO is actually what still runs it, but I run it on for men track, so I didn’t even need to reflash it.
All I had to do is put the new web server on and it picked it up right away. It was actually super easy for me to install because I’d already built it, but we were having quite the conversation and it was kind of cool to walk through with Ian. All of the steps that he’s going to need to do to build it.
So he’s got a raspberry PI, and right now he’s in the process of flashing that raspberry PI. Uh, he’s got a flash it, you have to get access to it via SSH. You want to install the Ferman track software, which. Is great. John Beeler, who was on the show, one of his main goals of creating this software was to make it into a one-line install.
And it really is, you just type in a single line of code it. Well, it’s not a line of code, a single command into the, a SSH of your raspberry PI, and it installs all of the software that you need. And then from there, once you have the hardware built, all you gotta do is flash it straight from that software.
So. It’s a very super easy thing to build. The cool part is, is that he’s in that process. He’s got a flash it. He’s got to wire it up, and here’s a couple of of tricks that I will tell the Ian and I’ll tell to anyone who wants to build a Furman track today. First of all. When you get your raspberry PI, you have to turn on SSH.
You just drop the file into it. You could do it headless and do a hardwired plugin when you get set up so that you can get on the wifi easy. And then you’re gonna do that one code or the one line of one line command and install your software. Uh, the other thing I’ll tell you is go into the, the, the Homebrew talk forum for Furman track and really look for.
An updated PCB that they found, or you can just go to pcbs.io. That’s pcbs.io and you could just search for ferment track and you’ll find a PCB there. And just look for the most recent update. And you want to buy it there, and what you’re going to get is it’s about $15 for four boards, but it’s going to give you four boards that you could solder and actually create four full devices out of that.
If you had all the temperature probes and you had a four plugs with a couple of relays, that’s really all that it takes. It’s not a big deal. And then once you actually put all of that together. The cool thing about getting a PCB premade is that the wiring diagram has already done for you. You don’t have to really think about it.
You just put the ESPN and it’s all wired up, and then you’re gonna add your external devices to that, which is your high power and the relay. And then you’re good to go. And at that point you’re good to go and set up. And so that’s my recommendation to Ian is like, Hey. Go by the PCBs, it’s totally worth the money.
And, uh, that’s pretty much it. It’s other than that, it’s a very, very simple, easy to set up device that’s gonna give you really, really. Really good temperature control.
well, that’s it for this week’s show, and. I’d love to hear some feedback from anyone if they liked this format. This was definitely new for me to not have an interview and to really just deep dive on a specific subject. If he found any of the information today helpful, let me know. If you didn’t like it, let me know.
I just am curious. You can also find the show on social media. Look for us on Twitter, Facebook, Instagram. Look under the acronym at homebrewing, DIY, all one word. Well, that’s it for this week, and we’ll see you next on harboring DIY. .